Fuzzy Winter Fox Hat for Kids Ages 4 to 10 – Sewing & Embroidery Pattern

I designed a couple of fleece animals hats for my kids last year. In the time since then, we have gotten stopped by strangers every time we go out to a store. Everyone loves these hats! They can be a bit work intensive, particularly the embroidery for the eyes and nose, but the finished product is absolutely worth it.

This fox hat pattern was designed for my 8 year old, whose head is 21.5″ around. Thanks to the flexible stretch of the fleece, this finished hat will fit kids from about age 4 through age 10. After age 10, the hat can still be worn, but it starts to get a bit snug and/or short.

Hat Sewing Instructions

Step 1: Cut the fleece pieces out

Click here to download the hat pattern. It will download as a 4-page PDF. Go ahead and cut out the pattern pieces. You’ll need to tape together the brim pattern pieces (the long, skinny piece).

I usually like to use no-pill fleece for my hats, although with this particular one I chose a more furry-feeling reddish-brown fleece. I stuck with normal no-pilling fleece for the black and white pieces, though.

From brownish-red felt: Cut 2 front pieces, 2 back pieces, 4 ear flaps, and 4 outer fox ears. Make sure the fox’s ears are cut as 2 mirrored pairs.

From white felt: Cut 2 inner fox ears, making sure they are mirrored. Also cut 1 face piece on the fold.

From black felt: Cut 2 brim pieces on a fold, 2 eyes, and 1 nose. make sure the eyes are a mirrored pair.


Step 2: Sew the face and ear pieces

Put white thread into your sewing machine.

Position and pin the white face to the main front piece, such that there is 1″ between the white outer eye points and the edge of the main brown piece. There should also be 1″ between the bottom of the white face and the bottom of the main brown piece. (See the picture.)


Sew around the edges of the white face with a zigzag stitch, using white thread. I used a width of 5 and a stitch length of 3.

Sew the white inner ears to the fronts of the outer ears with the same zigzag stitch. (See picture.)


Step 3: Sew the eye and nose pieces

Switch your thread color to black in the sewing machine.

Position and pin the black eye pieces onto the white face. Sew around the edges with a zigzag stitch, using black thread. I use a width of 5 and length 3 for most of the eye, but I narrow the width to a 3 at the outer points to help them taper nicely. (See picture.)

Step 5: Position the black nose onto the face and sew it into place with zigzag stitch.


Step 4: Hand embroider the facial features

Transfer the embroidery pattern to the fox face using your preferred method. I like to use water-soluble stabilizer. I use an ultra-washable Crayola marker to draw the pattern onto the stabilizer. Then I pin the stabilizer to the hat for stitching.

I embroider the face as follows:

Nostrils: First do a vertical satin stitch with light grey embroidery floss, 4 strands. Then underline the nostrils with split stitch, using 2 strands of white.

Nose detail: The long white line curving across the top of the nose, and the white line that goes vertically between the nostrils: Do both of these with 2 strands of white floss in split stitch.

Eyes – white sections: Sew the white highlights in the eyes and the white edges around the iris. Do both of these with 4 strands of white floss in satin stitch.

Eyes – iris: Use 2 strands of greenish-yellow floss and 1 strand of orange-brown floss. Stitch the iris with satin stitch. Your stitches should radiate out from the center, as shown in the picture below.

Under-eye outline: With 2 strands of black, sew a split stitch along the line just below both eyes.

Mouth: Sew the mouth with 4 strands of black in split stitch.

Tongue: With 4 strands of pink or red floss, sew the tongue with satin stitch.

When the embroidery is finished, dissolve the water-soluble stabilizer if you used any. Let the piece air dry overnight. Don’t try to put it into a dryer, because you risk the fleece edges coming apart.

Step 5: Sew the fox ears and the ear flaps

With right sides together, sew the fox ear fronts and backs together along the tops and sides with 1/4″ seam. Leave the bottom edge open. (Fox ears are the ones in the top of the picture.)

Also sew the ear flap fronts and backs together with right sides together, leaving the flat top edge open. (The ear flaps are the ones in the bottom of the picture.)

Turn everything right side out.


Step 6: Sew the outer pieces together

With right sides together, sew the outer front piece and outer back piece together along the sides and top with a 1/4″ seam. Leave the ear edges open, and leave the bottom open. I marked the edges you should sew with green in the picture.

(Warning: Make sure you’re sewing a BACK piece to your front embroidered piece. I once accidentally sewed the front liner to the front embroidered piece, and the subsequent seam ripping I had to do was the pits.)

Next, insert the fox ears inside the outer hat so that the ear fronts and the embroidered face are facing each other. Make sure the left ear and right ear are on the correct sides, so they point out and away from each other. See the pink arrows in the picture for guidance.


Once the ears are inserted, their bottom edges should stick out about 1/4″ past the hat’s opening. Sew in place 1/2″ from the edge of the ears (which is 1/4″ from the edge of the hat opening). You may need a long stitch length due to the number of layers for this stitching. I use length 4.

Confirm the stitching caught all layers and that no restitching is needed. Once that is confirmed, trim the excess seam from the ear bottoms. It should look like this after trimming.

Turn the outer hat right side out.


Step 7: Piece together the hat liner

With their right sides together, sew the front liner to the back liner. IMPORTANT: This time, you are sewing different edges than you did with the outer pieces! Only sew the sides and the ear edges together. Leave the top of the head open, and leave the bottom edge open. I’ve marked the edges to sew with green in the picture.


Step 8: Piece together the brim and ear flaps

With right sides together, pin the brim to the brim liner along their bottom edge. Insert the ear flaps between the brim and liner, as shown in the picture. Use the notches to line up the ear flaps where they belong. The ear flaps should be positioned so that they stick out 1/4″ past the edge of the brim seam.

Sew everything together along the brim bottom edge, as shown in the picture above. Use a wide zigzag stitch, so the brim keeps its stretchiness. I used a zigzag with width 3, length 4.

Step 9: Sew the brim into a circle

Next, open the seam you just stitched, so that the brim and brim liner are separated and lying flat. Fold the whole thing in half lengthwise, bringing together the short ends with right sides facing. Sew the ends together 1/4″ from the edge with a straight stitch, as shown in the picture here.


Step 10: Attach the brim to the hat

With right sides together, pin the brim to the bottom edge of the outer hat, lining up notches and seams. The brim seam from step 9 should line up with the hat’s back center notch. Sew all the way around with a zigzag stitch 1/4″ from the edge. I used zigzag width 3, length 4.

At this point, the hat should look like this with the brim unfolded all the way down:

Step 11: Attach the liner to the hat

With the hat liner inside out, pull the liner over the outer hat and line up the brim edge with the liner’s bottom edge. The hat and its liner should be right sides together.

You can pull the hat’s ears up through the hole in the top of the liner to help the fabric lay flat. (See picture.) Pin the brim to the liner, lining up notches and seams.

Sew around the hat with a zigzag stitch 1/4″ from edge, attaching the brim to the liner. I used zigzag width 3, length 4.


Step 12: Close up the liner

Pull the hat completely right side out. Push and pull on corners to help the seams flatten out. It will look like this.


Now double check that there are NO MORE PINS hiding in the fabric!! Once the coast is clear, fold the edges of the liner opening under 1/4″ and sew together as close to the edge as possible. Give a light tug after sewing to make sure the liner is completely closed and that no little holes remain.


Step 13: Finishing touches

Push the liner up inside the hat. At this point, you can call the project finished and get on with life, or you can do the final step that I like to do to secure the liner inside the hat.

With a regular sharps needle and black thread, I throw a couple hidden stitches right on top of the brim seam at the front center and back center.

Phew, you did it! I think my favorite part of this hat sewing pattern is how easy it is to tweak it into just about any animal. Simply change the eye, nose, and ear shapes, and use a different color felt. I’ve made a few birthday presents for local friends’ kids, where I even tailored the hat to look like their pet cat or dog. So much fun!

Even our family dog approves of the fox hat!

Tooth Fairy Pillow Sewing Pattern — Includes Embroidery Pattern with Optional Appliqué

embroidered tooth fairy pillow sewing pattern

Oof! I can’t believe it’s been so long since my last post. I got sucked into the whirlwind of Halloween costume making, then planning an outdoor craft-themed birthday party for my 7-year-old, right into Thanksgiving meal planning, followed by the inevitable insanity of making gifts in time for Christmas day. Then in January, we got caught up in some unexpected house construction. Not the fun kind.

So, long story short, it feels like I blinked and rode a rollercoaster straight from September into February. And while the bad news is that all that craziness stopped me from blogging, the GOOD news is that I’ve been keeping track of my crafts and creations over the past 5 months. In other words, I’ve got some GREAT projects all photographed and lined up to share — I just need a little time to get them typed up. It will happen!

In the meantime, I’m gonna share some oldie-but-goodie projects that I used to sell. Since they haven’t been available on the Etsy store for a couple years, I’ve decided to go ahead and throw them up here for general public consumption. First out of the gate is this fabulous tooth fairy pillow with a tiny pocket that I’ve made for my own kids as well as for other friends and family members as gifts. There are two versions of the pillow — one with appliqué for the fairy dress and one with only embroidery. Both versions are available in the same download along with embroidery instructions and thread instructions. And, of course, instruction videos for all the embroidery stitches in this project are available on my website in the “Embroidery Tutorials” section.

Click here to download the 12-page PDF, which includes the printable embroidery and appliqué patterns, as well as in-depth sewing instructions with color pictures.

To personalize the pillow with the name of your choice, you can also check out my tutorial on how to easily create your own embroidery lettering pattern with any word processor.

Did You Try Out This Tooth Fairy Embroidery Design?

If you make this pillow, let me know in the comments below how it turned out! And give me a shout in the comments if you have any questions about my pattern. Have fun stitching!

Reversible Sun Hat Sewing Pattern, Part 3

This is the third and final part of my sewing pattern for a wide-brimmed hat for kids and adults. If you’re looking for the other sections of this tutorial, you can click here for part 1 or click here for part 2.


Next, Add the Felt to Your Liner

Continue using Thread Color B in both your main spool and your bobbin for steps 13 and 14.

Sun hat instructions

Step 13: Pin the felt pieces to the wrong side of your liner, as shown. The 3 felt pieces will overlap in such a way that each felt’s side edges will align with the brim’s pressed-open seams (see upper photo).

Once pinned, the felt’s inside curve should line up closely with the circular seam at the base of the crown. The brim’s outer edge will have about 1/4 inch with no felt on it.

Sun hat instructions

Step 14: With the felt still pinned in place, sew along the brims’s original seam lines, as shown. This will secure the felt to the brim in such a way that hides the stitching. Only sew along the brim seam. Do not sew onto the crown.


Time to Put the Two Sides Together!

For steps 15 through 18, use Thread Color A in the top spool, and use Thread Color B in your bobbin.

Sun hat instructions

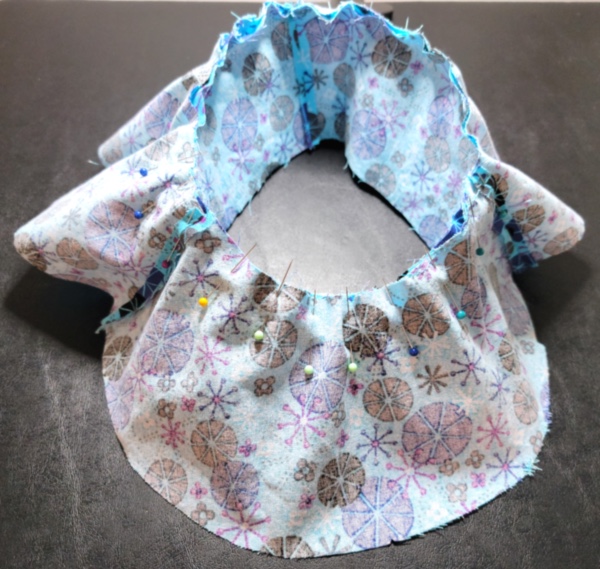
Step 15a: This is one of my favorite steps, because the hat really comes together here. Put the liner and the main fabric together with right sides together. Make sure you line up your brim seams and your loops carefully, and pin the two brims together around the outer edge.

Step 15b: Sew the liner and main hat together around the brim’s outside edge with 1/4 inch seam, BUT leave a 3-inch unsewn gap to the right of the brim’s back center seam. You will need this gap to turn your hat right side out!

Note that the gap should be just to the right (or the left) of the back’s center seam. Don’t leave the gap dead center at the back, because it can be tough to close the gap later when it includes overlapped felt and other seams.

Step 16a: Turn the hat right side out. Push out the brim’s outer edge as much as possible.

Step 16b: Now you need to close that gap. Start by folding your liner fabric over the felt’s curved edge, as shown in the top picture here, and pin it in place. I recommend placing a pin every 1/2 inch or so to help maintain a nice curved edge.

Step 16c: Fold the main fabric under and inside the brim, matching its curved edge with the liner as much as possible. Pin in place.

Notice in the bottom picture that I place perpendicular pins for step 16b, and then I use parallel pins for step 16c. I leave all these pin in, removing them only as the sewing needle approaches them in step 17. This helps me to keep a nice, gradual curve.

sun hat sewing pattern

Step 17: Topstitch around the outer edge of the brim, 1/8 inch from the edge. This stitching will serve the dual purpose of sewing the gap closed from step 16, as well as being the first round of quilt-like stitching to shape the brim.

Tip: Start and stop this round of stitching near the back of the hat, in order to keep the front brim looking neat and seamless. Do this for step 18, too.

sun hat free sewing pattern

Step 18: Continue to topstitch the brim in circles, as shown. Each round of topstitching should be 1/2 inch inward from the previous round. Stop when you are less than 3/4 inch from the crown seam.

Important! As you get close to the crown, be careful and hold the loops out of the way to avoid sewing over them. Don’t forget to avoid the loops on the underside of the hat, too!

Tip: I recommend holding the brim’s unsewn fabric and felt in place with pins while you topstitch. This helps to stop the fabric from falling out of shape or bunching.


The Final Touch!

sun hat sewing pattern

Step 19: Remember the two ties you made way back in step 1? Time to grab them and finish this puppy up.

There are two ways you can attach your ties to your hat. The first is simply to knot them on the loops, as shown in the top picture. When you want to reverse the hat, untie the ties and knot them on the loops on the other side of the hat.

The second method, which is my preference, is to add snaps to your ties. Attach the male end of the snap to the very end of a tie. Attach the female end to the same side, about 1 inch away from the male end, as shown in the bottom picture. Do the same to the second tie.

With this second method, you can use grommet snaps or sew-on snaps. I like to use sew-on snaps, especially when attaching them to multiple layers of fabric like this, because there is far less chance of messing up or damaging the fabric.


The only thing left to do now is enjoy a sunny day in your new hat! If you gave this pattern a try, share a picture in the comments below. And of course, don’t hesitate to leave a question if anything here needs clarification for you.

sun-hat-sewing-pattern-for-kids-adults

Reversible Sun Hat Sewing Pattern, Part 2

Welcome to part 2 of my sewing tutorial for a wide-brimmed, reversible sun hat with removable ties. If you haven’t already printed your pattern and cut your fabric, click here to hop over to part 1 of the tutorial.

Ready to start sewing? Let’s get going!

sun-hat-sewing-pattern-for-kids-adults
 

First, sew your lightweight fabric pieces together.

THREAD COLOR: For the rest of this pattern, “Thread Color A” refers to the thread that matches your lightweight fabric. “Thread Color B” is the thread that matches your medium-weight liner fabric.

For steps 1 to 11, use Thread Color A in both your top spool and your bobbin.

bias tape end finishing

Step 1a: Sew together your bias tape strips until you have two 30″ long pieces; then iron them into a double fold. This tutorial video shows you how to make double-fold bias tape.

Step 1b: To finish the ends of each bias tape strip, first unfold the strip’s end and lay it flat. Fold each corner toward the center so that the fabric ends in a point. Fold the point down, and then refold the original double-fold of the bias tape. Do this folding to both ends of the strip.


Step 1c: With the ends folded in, sew along your strips with a zigzag stitch. I use a width 2 (out of 5), length 3 (out of 5) zigzag stitch with my machine.

Once both strips are sewn, set them to the side. We’ll come back to these at the end for your hat ties.


Step 2a: Now grab the two rectangle shapes, which will be the hat loops for the removable ties. These are basically going to be folded and sewn like very short bias tape strips.

Step 2b: Fold both strips in half lengthwise and press with an iron.

Step 2c: Unfold the strips. Use the crease that you created with step 2b as a guide. Fold the sides inward so that the edges meet in the center, as shown in the picture. Do this to both strips, and press the new creases with an iron.

Step 2d: Fold both strips in half again along the original crease from step 2b. Sew along the length of the strips with a zigzag stitch, width 2 and length 3, same as you did with the bias tape in step 1b. However, this time do not fold under or finish the ends. Leave them raw.


Step 3: With right sides facing, sew the 3 brim pieces together with 1/4 inch seam. Press the seams open with an iron, as shown.

Step 4: With right sides facing, sew the 3 crown pieces together with 1/4 inch seam. Press the seams open with an iron, as shown.

 
sun hat instructions

Step 5a: Fold the brim in half with one of the seams at the folded edge. The other two seams will lie flat and overlap each other, as shown in picture 5a.

Step 5b: Fold the brim in half a second time, as shown in picture 5b. There are now 2 layers of fabric folded on the left side. Place a pin in each layer on the fold, as shown, with one pin on the outside of the fold and the second pin on the inside of the fold.. Do not pin the two layers together! The purpose of these pins is to mark the exact centers on the left and right sides of the hat. (Alternatively, you can also make a mark with chalk.)

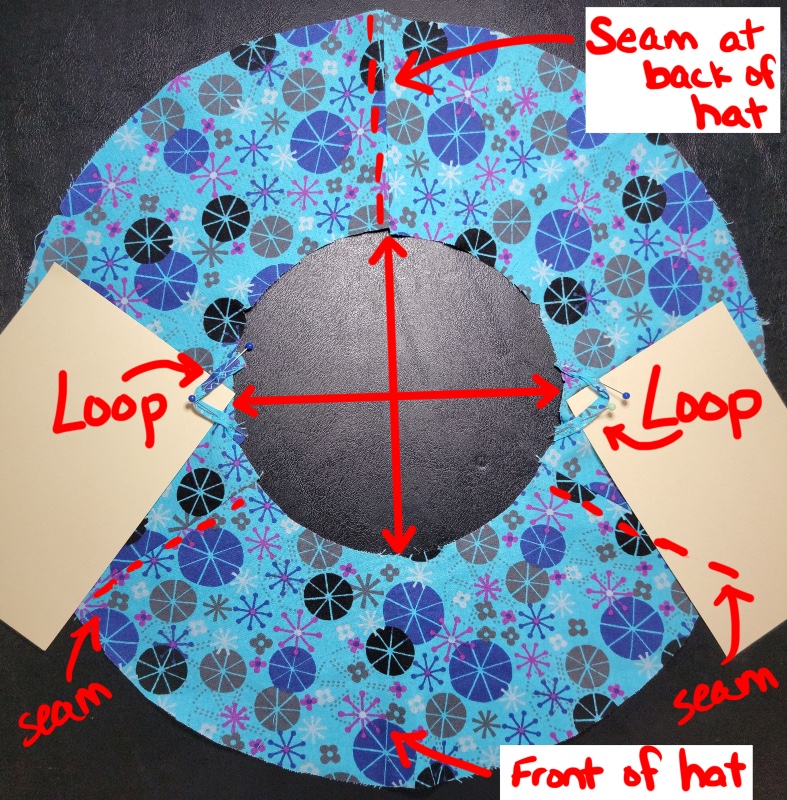
Step 5c: Unfold the brim all the way until it is a full circle again. Using the pins from 5b as markers. attach the loops to the right side of the brim as shown. The 5b pin marker should be at the center of the loop.

 
sun hat instructions

Checking in: This is how your brim should look right now. (I put some cardstock under the loops to make them easier to see.) Note that the back of the hat will have a seam, while the front of the hat will not have a seam. Keep this in mind as you start attaching sections in future steps.

Step 6: Sew 1/8 inch from the edge of the brim to attach the loops.

 
sun hat instructions

Step 7: Trim any excess loop so that its edges are flush with the brim’s edge.

 
sun hat instructions

Step 8: With right sides together, pin the LARGER side of the crown to the SMALLER side of the brim, as shown. Be sure to match seams and notches to each other. Sew around with 1/4 inch seam.

 
sun hat instructions

Step 9: Press the seam from step 8 up toward the crown and topstitch it down. Make sure to push the loops toward the brim so they don’t get caught under the stitches. The topstitching should go all the way around the base of the crown, 1/8 inch away from the seam.

 
sun hat instructions

Step 10: Pin the circular top piece to the crown with right sides together, as shown. The double notch on the top piece should line up with the seam on the BACK of the hat (not either of the side seams). The other 5 notches on the top piece should line up with the remaining seams and notches on the crown. Sew all the way around, 1/4″ from the edge.

Advice: By putting your pins on the crown side, not the top, you’ll find it easier to avoid accidental fabric bunching while you stitch. Go slow on this round. I recommend pausing frequently to re-straighten your fabric as you work your way around.

 
sun hat instructions

Step 11: Press the seam from step 10 toward the crown, and topstitch it down. Topstitch all the way around, 1/8 inch away from the seam.


Now it’s time to sew the liner!

THREAD COLOR: For steps 12 to 14, use Thread Color B in both your top spool and bobbin.

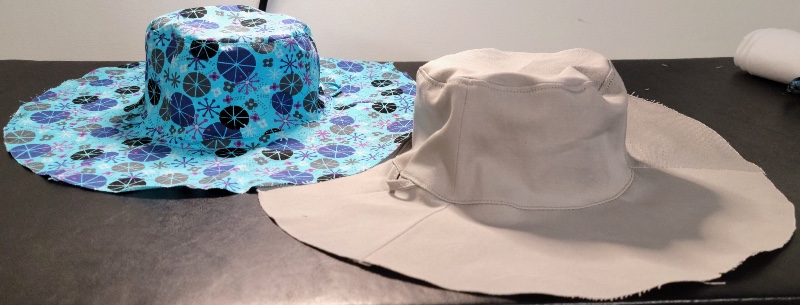
Step 12: Repeat steps 2 to 11 with your liner fabric. You will end up with the two halves of your hat, like the ones shown here.


You’re almost to the finish line now! Head on to part 3 of my sewing hat tutorial for instructions on how to put the remaining pieces together.

Reversible Sun Hat Sewing Pattern, Part 1

wide brim sun hat sewing pattern for kids and adults

I own this marvelous sun hat that I bought at The Gap about 20 years ago. It’s a little big for my head, but it’s comfortable. More importantly, it has this amazing wide brim to keep the sun off my face, neck, and chest when I’m working in the mid-day heat. I’ve wanted to get similar hats for my kids, but I simply cannot find a reasonably priced hat that 1) fits their heads comfortably, 2) has a wide brim all the way around, 3) has a tie to keep the hat from blowing away, and 4) comes in a color or pattern that my kids will wear willingly. (That last one is extra tough when it comes to my teenage son!)

old sun hat
My 20-year-old sun hat really needed a replacement.

So I finally gave up and decided to make a hat pattern using my old hat as inspiration. The old hat was built from two half-circle arcs to create the brim. I opted to break the sides and brim into thirds, which makes it easier to use fabric with a directional pattern. The old hat didn’t have ties, either, so I added loops. This way, a tie can be added or removed, depending on how windy the day gets. Having loops instead of sewing the ties directly to the hat also makes it possible for the hat to be reversible.

Finally, I faced my biggest challenge: how could I give the hat a nice wide brim for sun protection, without the brim flopping down and covering the eyes? This was my biggest beef with my old Gap hat, actually. The solution came to me while I was organizing my kids’ craft bin. Felt! When I added a layer of inexpensive craft felt to the hat’s brim and then top stitched the brim in a faux-quilted method, the hat ended up with a Goldilocks “just right” balance of stiffness and floppiness.

And voila, the new sun hats are perfect! They came out so well, in fact, that other moms at the playground have been stopping me to ask where I bought them. I feel like one of the best compliments a seamstress can get is when people can’t tell your work is home made.


Prep Your Sun Hat Project: Tools & Materials Needed

  • Difficulty level: Intermediate
  • Total Cutting & Sewing Time: About 3.5 hours

You don’t need a lot of extra sewing notions for this project. Along with your sewing machine, pins, and tape measure, you’ll need the following materials…

  • Patterned side: 1/2 yard lightweight fabric. I use cotton quilting fabric. Two fat quarters of fabric can work just as well as a complete 1/2 yard piece.
  • Solid side: 1/2 yard medium-weight fabric. I use a polyester-cotton-blend twill fabric (the type that khaki pants are often made from).
  • Sewing thread in two colors, one to match each fabric. (As an alternative, you can use one color thread that matches one fabric and works as a contrast against the second fabric.)
  • Crafting felt – I use plain white felt. Three pieces of standard 9″x12″ craft felt will be plenty if you are making a hat sized 23″ or smaller. If you are making a hat for sizes 24″ or 25″, though, you will need to buy larger felt that can produce 3 pieces that are 9″ x 14″. (I buy my bulk felt as a single 1-yard piece from Michaels for about $4.)
  • Optional: Two sew-on snaps. This is to make the ties removable. If you don’t want to deal with snaps, you can also simply make a knot to attach the ties to the hat. I don’t recommend buttons or hooks, because hair can get caught in them.

The materials listed above will be enough for all the different hat sizes available in this post. Of course, if you are making one of the smaller hat sizes, you’ll end up with some leftover fabric – maybe even enough to whip up a small drawstring bag to match the hat. (But that is a pattern for another day…)


Measure Your Head & Print Your Pattern

To start, measure the head circumference of the person getting the new hat. Wrap a tape measure around the head, going just above the eyebrows and ears and going around the back at the widest point of the base of the head.

Don’t pull the tape measure too tight while measuring, but don’t worry about leaving any extra slack, either. The patterns include 1″ ease already. (In other words, the hat for an 18″ head is actually 19″ around its base.)

Once you know the circumference measurement of the head getting a new hat, go ahead and print the correct pattern size from the options below.


Pre-Shrink Your Fabric & Cut Your Pieces

I really cannot emphasize this enough: Run your fabric and felt through the washing machine and dry it on high temperature to shrink the fabric down as much as possible before you cut the pieces. There is nothing worse than putting a lot of energy into sewing something, only to have it shrink in the wash and not fit anymore.

Once you have pre-shrunk your fabric, go ahead and cut out the pieces as directed in the pattern. In addition to cutting the pattern pieces that you print, you also need to cut enough diagonal 2-inch-wide strips to make about 2 yards of 1/2-inch double-fold bias tape. (There’s a great video on how to cut and sew your own bias tape here.) You only need to cut your bias tape strips from the lightweight patterned fabric. Do not cut bias tape strips from your liner fabric.

Here is one possible layout for cutting your fabric from a half-yard of 45″ fabric. (Keep in mind, this layout shows the largest hat size of 25″. For smaller hats, you’ll end up with more leftover fabric and may even want to arrange the pieces differently as you cut.)

If you buy your fabric as two fat-quarter squares, this cutting layout will work better for you. Note that the top and bottom edges are 22″, and the side edges are the shorter 18″ edges of the fat quarter.

Last but not least, cut your felt. As I mentioned above, you should have no trouble cutting from a standard 9″ x 12″ piece of felt if you are making hat sizes 18″ through 23″. If you are making size 24″ or 25″, though, your felt pieces will need to be bigger.


Phew! Are you finished with that prep work? Then head on to part two of this post, where I explain how to sew all the pieces together!

Cell Phone Satchel, Part 2 – Sewing Pattern

cell phone bag

If you are here, then you should have already finished the instructions in part one of this cell phone satchel sewing pattern. If you have not already done part one, you can find it here.

All right, let’s dive back into these instructions!


Start Putting All the Pieces Together!

satchel instructions

At the end of step 10 in part one, your main fabric and your liner look like this. You should also have your two pieces of bias tape for the strap and button closure, with zigzag stitching along their lengths.


satchel instructions

Step 11 : Sew the ends of the bias tape strap to the right side of the felt liner, as shown. The strap ends should be attached at the center of the side panels, and the stitching should be 1/8″ from the edge. Before you sew, make sure the strap is not twisted!

Step 12: Sew the ends of the button-closure bias tape to the center of the top panel, on the right side of the fabric, as shown. The ends should not overlap but should be right next to each other. As with the strap in step 11, sew 1/8″ from the edge.


satchel instructions

Step 13: Pin the top edge of the main fabric and the liner with right sides together, as shown. Be sure to match up any seams or corners as closely as possible.

Important: Pull the bias tape strap and button closure between the two fabric layers and away from the edge. Keep them positioned flat and fully perpendicular to the edge you’re about to sew. You don’t want a wonky button loop!

Sew along the entire top edge, as shown with red arrows in this photo. (I have marked start and end points, but it doesn’t really matter which side you start on.) When you reach the midpoint where you have to turn a 90-degree corner, leave your needle in your fabric, then raise your presser foot, turn the fabric, lower the foot again, and continue stitching.


satchel instructions

Step 14: Clip the edges of the curved fabric, as shown. Clip close to the stitch line, but be careful not to cut the stitching itself!

This will help the curved seam lie flat when you turn the bag right side out.


satchel instructions

Step 15: Separate the liner from the main fabric. Pull the top curved flap upward, and pull the bottom panels away from each other, as shown. Do not turn the bag right side out! The bias tape should be inside the fabric layers, as you can see in the photo.


satchel instructions

Step 16: With the main fabric and liner still pulled apart from step 15, sew closed the remaining side seam of the main fabric. The stitching must stop when it reaches the seam at the base of the curved flat. I’ve marked this stopping point with an arrow in the photo.


satchel instructions

Step 17: Repeat step 16 on the liner, but leave a 3 inch gap in the middle. (It’s hard to see in the photo, but the main fabric is still separated from the liner and pulled away to the right.)

Note: I recommend the gap be centered like this instead of down at one of the corners. By machine stitching on both sides of the gap, you ensure a neat, tightly closed corner. You don’t want a hole opening up later at the bottom of your bag’s liner!


satchel instructions

Step 18: Now for an exciting step! Turn your bag right side out, using the gap you left in the liner. Keep the main fabric and liner separate for now, as shown in the picture. Using a tool such as a chopstick, gently push out the corners and curves as much as possible.

Sew the liner gap closed now by folding the edges in 1/4″ and pinning them. (I like to use a safety pin so I don’t stab myself, but a straight pin is also fine.) Now when I do this, I don’t pin the two sides together; I find the felt to be too bulky for that. Instead, I fold one edge under 1/4″ and pin that fold. Then I fold the other edge in 1/4″ and use a second pin on that.

With the two sides folded under, I then hold the two sides together with one hand and sew the gap closed with the other. I like to use a slip stitch for this step, but a whip stitch is also perfectly fine.


satchel instructions

Step 19: You’re on the home stretch! Push your liner inside the main fabric. Make sure the top seam where the liner meets the main fabric is pulled taut as much as possible. You can tug gently on the bias tape straps and the button loop to help shape the seam edge. Then pin the seam into place, as shown, all the way around the bag’s opening.


satchel instructions

Step 20: Sew a line of topstitching all the way around the opening of the bag, 1/8 inch from the outer edge. You can two different thread colors in your main spool and bobbin to match your main fabric and liner fabric, respectively. Or you can do what I did, and use your liner color on both sides to add some contrast color to the top of your bag.


satchel instructions

Step 21: The only step left now is to add your button. Close your top panel over the bag. Put your fabric chalk through the button loop and make a mark where you want the loop positioned when the bag is closed.

Open the bag again and, with the button loop moved out of the way, sew your button to the front of your bag. The button center should be directly over the chalk mark you made.


satchel instructions

And that’s all she wrote!

If you’re like me and want your bag to hang at different lengths depending on your activity of the moment, you can put a simple knot near the top of the strap to shorten it. Then untie the knot when you want the strap longer again.

If you gave this pattern a try, let me know in the comments how your cell phone bag came out. I love pictures, too!


free sewing pattern for cell phone bag