Reversible Sun Hat Sewing Pattern, Part 2

Welcome to part 2 of my sewing tutorial for a wide-brimmed, reversible sun hat with removable ties. If you haven’t already printed your pattern and cut your fabric, click here to hop over to part 1 of the tutorial.

Ready to start sewing? Let’s get going!

sun-hat-sewing-pattern-for-kids-adults
 

First, sew your lightweight fabric pieces together.

THREAD COLOR: For the rest of this pattern, “Thread Color A” refers to the thread that matches your lightweight fabric. “Thread Color B” is the thread that matches your medium-weight liner fabric.

For steps 1 to 11, use Thread Color A in both your top spool and your bobbin.

bias tape end finishing

Step 1a: Sew together your bias tape strips until you have two 30″ long pieces; then iron them into a double fold. This tutorial video shows you how to make double-fold bias tape.

Step 1b: To finish the ends of each bias tape strip, first unfold the strip’s end and lay it flat. Fold each corner toward the center so that the fabric ends in a point. Fold the point down, and then refold the original double-fold of the bias tape. Do this folding to both ends of the strip.


Step 1c: With the ends folded in, sew along your strips with a zigzag stitch. I use a width 2 (out of 5), length 3 (out of 5) zigzag stitch with my machine.

Once both strips are sewn, set them to the side. We’ll come back to these at the end for your hat ties.


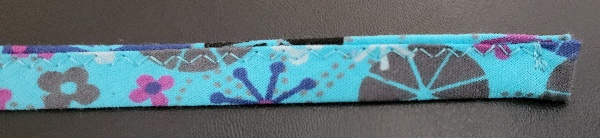
Step 2a: Now grab the two rectangle shapes, which will be the hat loops for the removable ties. These are basically going to be folded and sewn like very short bias tape strips.

Step 2b: Fold both strips in half lengthwise and press with an iron.

Step 2c: Unfold the strips. Use the crease that you created with step 2b as a guide. Fold the sides inward so that the edges meet in the center, as shown in the picture. Do this to both strips, and press the new creases with an iron.

Step 2d: Fold both strips in half again along the original crease from step 2b. Sew along the length of the strips with a zigzag stitch, width 2 and length 3, same as you did with the bias tape in step 1b. However, this time do not fold under or finish the ends. Leave them raw.


Step 3: With right sides facing, sew the 3 brim pieces together with 1/4 inch seam. Press the seams open with an iron, as shown.

Step 4: With right sides facing, sew the 3 crown pieces together with 1/4 inch seam. Press the seams open with an iron, as shown.

 
sun hat instructions

Step 5a: Fold the brim in half with one of the seams at the folded edge. The other two seams will lie flat and overlap each other, as shown in picture 5a.

Step 5b: Fold the brim in half a second time, as shown in picture 5b. There are now 2 layers of fabric folded on the left side. Place a pin in each layer on the fold, as shown, with one pin on the outside of the fold and the second pin on the inside of the fold.. Do not pin the two layers together! The purpose of these pins is to mark the exact centers on the left and right sides of the hat. (Alternatively, you can also make a mark with chalk.)

Step 5c: Unfold the brim all the way until it is a full circle again. Using the pins from 5b as markers. attach the loops to the right side of the brim as shown. The 5b pin marker should be at the center of the loop.

 
sun hat instructions

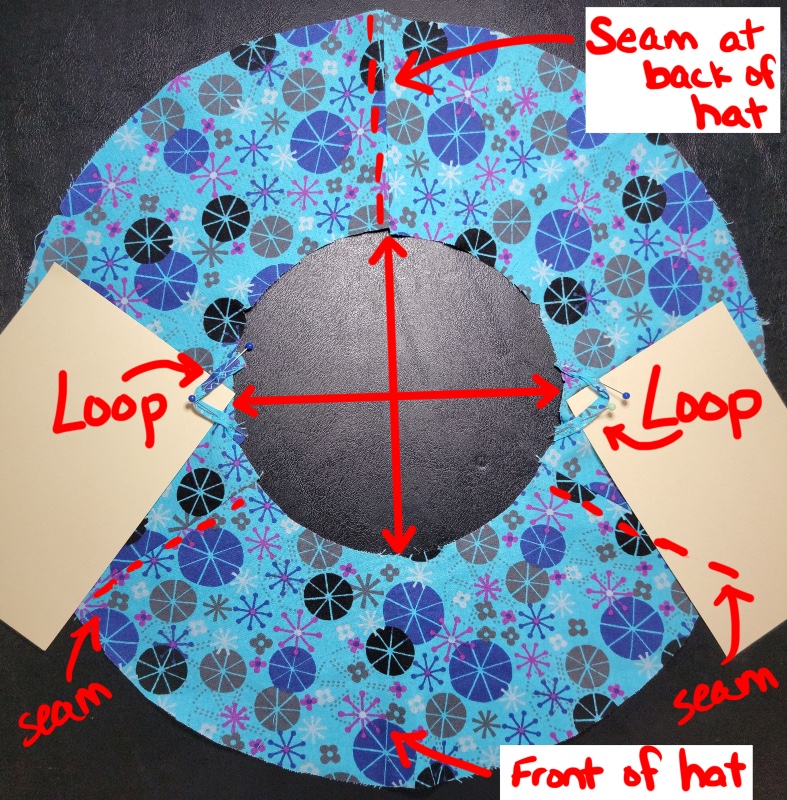
Checking in: This is how your brim should look right now. (I put some cardstock under the loops to make them easier to see.) Note that the back of the hat will have a seam, while the front of the hat will not have a seam. Keep this in mind as you start attaching sections in future steps.

Step 6: Sew 1/8 inch from the edge of the brim to attach the loops.

 
sun hat instructions

Step 7: Trim any excess loop so that its edges are flush with the brim’s edge.

 
sun hat instructions

Step 8: With right sides together, pin the LARGER side of the crown to the SMALLER side of the brim, as shown. Be sure to match seams and notches to each other. Sew around with 1/4 inch seam.

 
sun hat instructions

Step 9: Press the seam from step 8 up toward the crown and topstitch it down. Make sure to push the loops toward the brim so they don’t get caught under the stitches. The topstitching should go all the way around the base of the crown, 1/8 inch away from the seam.

 
sun hat instructions

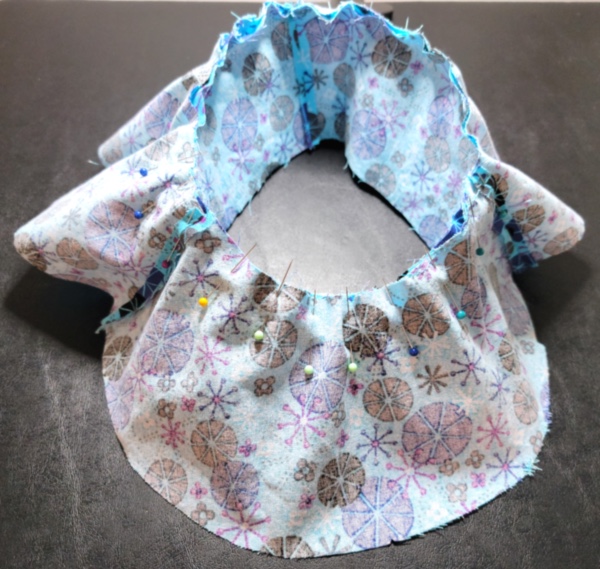
Step 10: Pin the circular top piece to the crown with right sides together, as shown. The double notch on the top piece should line up with the seam on the BACK of the hat (not either of the side seams). The other 5 notches on the top piece should line up with the remaining seams and notches on the crown. Sew all the way around, 1/4″ from the edge.

Advice: By putting your pins on the crown side, not the top, you’ll find it easier to avoid accidental fabric bunching while you stitch. Go slow on this round. I recommend pausing frequently to re-straighten your fabric as you work your way around.

 
sun hat instructions

Step 11: Press the seam from step 10 toward the crown, and topstitch it down. Topstitch all the way around, 1/8 inch away from the seam.


Now it’s time to sew the liner!

THREAD COLOR: For steps 12 to 14, use Thread Color B in both your top spool and bobbin.

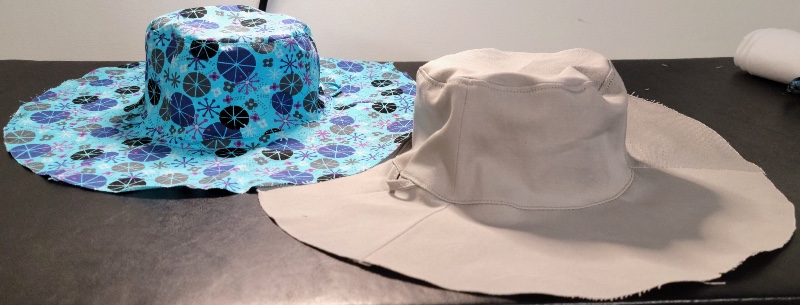
Step 12: Repeat steps 2 to 11 with your liner fabric. You will end up with the two halves of your hat, like the ones shown here.


You’re almost to the finish line now! Head on to part 3 of my sewing hat tutorial for instructions on how to put the remaining pieces together.

Reversible Sun Hat Sewing Pattern, Part 1

wide brim sun hat sewing pattern for kids and adults

I own this marvelous sun hat that I bought at The Gap about 20 years ago. It’s a little big for my head, but it’s comfortable. More importantly, it has this amazing wide brim to keep the sun off my face, neck, and chest when I’m working in the mid-day heat. I’ve wanted to get similar hats for my kids, but I simply cannot find a reasonably priced hat that 1) fits their heads comfortably, 2) has a wide brim all the way around, 3) has a tie to keep the hat from blowing away, and 4) comes in a color or pattern that my kids will wear willingly. (That last one is extra tough when it comes to my teenage son!)

old sun hat
My 20-year-old sun hat really needed a replacement.

So I finally gave up and decided to make a hat pattern using my old hat as inspiration. The old hat was built from two half-circle arcs to create the brim. I opted to break the sides and brim into thirds, which makes it easier to use fabric with a directional pattern. The old hat didn’t have ties, either, so I added loops. This way, a tie can be added or removed, depending on how windy the day gets. Having loops instead of sewing the ties directly to the hat also makes it possible for the hat to be reversible.

Finally, I faced my biggest challenge: how could I give the hat a nice wide brim for sun protection, without the brim flopping down and covering the eyes? This was my biggest beef with my old Gap hat, actually. The solution came to me while I was organizing my kids’ craft bin. Felt! When I added a layer of inexpensive craft felt to the hat’s brim and then top stitched the brim in a faux-quilted method, the hat ended up with a Goldilocks “just right” balance of stiffness and floppiness.

And voila, the new sun hats are perfect! They came out so well, in fact, that other moms at the playground have been stopping me to ask where I bought them. I feel like one of the best compliments a seamstress can get is when people can’t tell your work is home made.


Prep Your Sun Hat Project: Tools & Materials Needed

  • Difficulty level: Intermediate
  • Total Cutting & Sewing Time: About 3.5 hours

You don’t need a lot of extra sewing notions for this project. Along with your sewing machine, pins, and tape measure, you’ll need the following materials…

  • Patterned side: 1/2 yard lightweight fabric. I use cotton quilting fabric. Two fat quarters of fabric can work just as well as a complete 1/2 yard piece.
  • Solid side: 1/2 yard medium-weight fabric. I use a polyester-cotton-blend twill fabric (the type that khaki pants are often made from).
  • Sewing thread in two colors, one to match each fabric. (As an alternative, you can use one color thread that matches one fabric and works as a contrast against the second fabric.)
  • Crafting felt – I use plain white felt. Three pieces of standard 9″x12″ craft felt will be plenty if you are making a hat sized 23″ or smaller. If you are making a hat for sizes 24″ or 25″, though, you will need to buy larger felt that can produce 3 pieces that are 9″ x 14″. (I buy my bulk felt as a single 1-yard piece from Michaels for about $4.)
  • Optional: Two sew-on snaps. This is to make the ties removable. If you don’t want to deal with snaps, you can also simply make a knot to attach the ties to the hat. I don’t recommend buttons or hooks, because hair can get caught in them.

The materials listed above will be enough for all the different hat sizes available in this post. Of course, if you are making one of the smaller hat sizes, you’ll end up with some leftover fabric – maybe even enough to whip up a small drawstring bag to match the hat. (But that is a pattern for another day…)


Measure Your Head & Print Your Pattern

To start, measure the head circumference of the person getting the new hat. Wrap a tape measure around the head, going just above the eyebrows and ears and going around the back at the widest point of the base of the head.

Don’t pull the tape measure too tight while measuring, but don’t worry about leaving any extra slack, either. The patterns include 1″ ease already. (In other words, the hat for an 18″ head is actually 19″ around its base.)

Once you know the circumference measurement of the head getting a new hat, go ahead and print the correct pattern size from the options below.


Pre-Shrink Your Fabric & Cut Your Pieces

I really cannot emphasize this enough: Run your fabric and felt through the washing machine and dry it on high temperature to shrink the fabric down as much as possible before you cut the pieces. There is nothing worse than putting a lot of energy into sewing something, only to have it shrink in the wash and not fit anymore.

Once you have pre-shrunk your fabric, go ahead and cut out the pieces as directed in the pattern. In addition to cutting the pattern pieces that you print, you also need to cut enough diagonal 2-inch-wide strips to make about 2 yards of 1/2-inch double-fold bias tape. (There’s a great video on how to cut and sew your own bias tape here.) You only need to cut your bias tape strips from the lightweight patterned fabric. Do not cut bias tape strips from your liner fabric.

Here is one possible layout for cutting your fabric from a half-yard of 45″ fabric. (Keep in mind, this layout shows the largest hat size of 25″. For smaller hats, you’ll end up with more leftover fabric and may even want to arrange the pieces differently as you cut.)

If you buy your fabric as two fat-quarter squares, this cutting layout will work better for you. Note that the top and bottom edges are 22″, and the side edges are the shorter 18″ edges of the fat quarter.

Last but not least, cut your felt. As I mentioned above, you should have no trouble cutting from a standard 9″ x 12″ piece of felt if you are making hat sizes 18″ through 23″. If you are making size 24″ or 25″, though, your felt pieces will need to be bigger.


Phew! Are you finished with that prep work? Then head on to part two of this post, where I explain how to sew all the pieces together!