Fuzzy Winter Fox Hat for Kids Ages 4 to 10 – Sewing & Embroidery Pattern

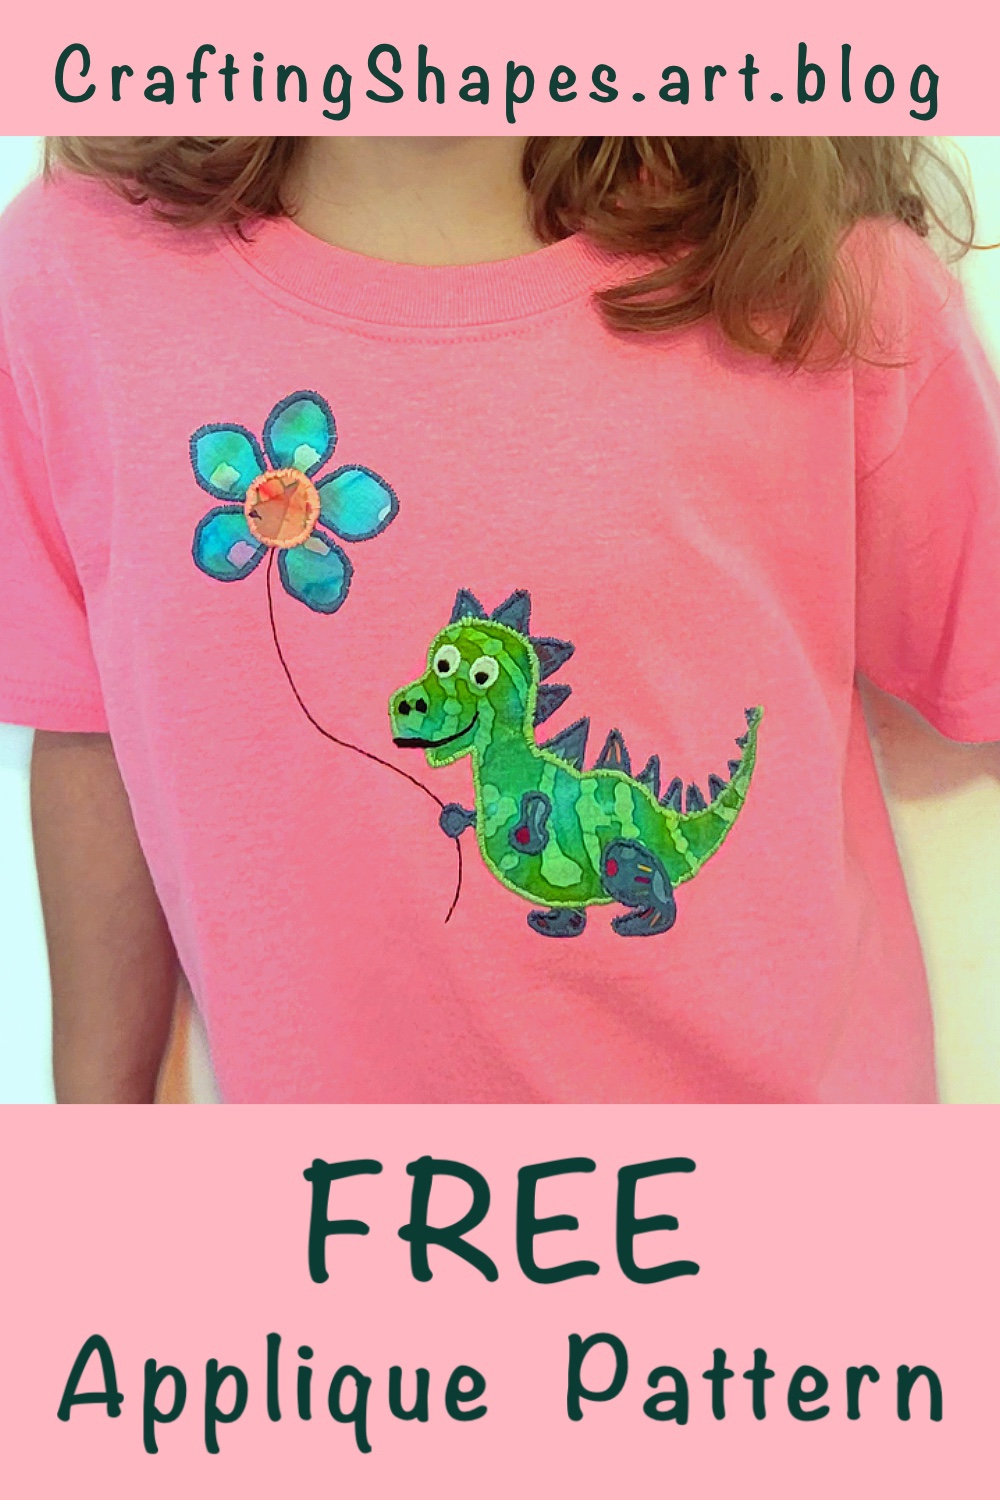
I designed a couple of fleece animals hats for my kids last year. In the time since then, we have gotten stopped by strangers every time we go out to a store. Everyone loves these hats! They can be a bit work intensive, particularly the embroidery for the eyes and nose, but the finished product is absolutely worth it.

This fox hat pattern was designed for my 8 year old, whose head is 21.5″ around. Thanks to the flexible stretch of the fleece, this finished hat will fit kids from about age 4 through age 10. After age 10, the hat can still be worn, but it starts to get a bit snug and/or short.

Hat Sewing Instructions

Step 1: Cut the fleece pieces out

Click here to download the hat pattern. It will download as a 4-page PDF. Go ahead and cut out the pattern pieces. You’ll need to tape together the brim pattern pieces (the long, skinny piece).

I usually like to use no-pill fleece for my hats, although with this particular one I chose a more furry-feeling reddish-brown fleece. I stuck with normal no-pilling fleece for the black and white pieces, though.

From brownish-red felt: Cut 2 front pieces, 2 back pieces, 4 ear flaps, and 4 outer fox ears. Make sure the fox’s ears are cut as 2 mirrored pairs.

From white felt: Cut 2 inner fox ears, making sure they are mirrored. Also cut 1 face piece on the fold.

From black felt: Cut 2 brim pieces on a fold, 2 eyes, and 1 nose. make sure the eyes are a mirrored pair.


Step 2: Sew the face and ear pieces

Put white thread into your sewing machine.

Position and pin the white face to the main front piece, such that there is 1″ between the white outer eye points and the edge of the main brown piece. There should also be 1″ between the bottom of the white face and the bottom of the main brown piece. (See the picture.)


Sew around the edges of the white face with a zigzag stitch, using white thread. I used a width of 5 and a stitch length of 3.

Sew the white inner ears to the fronts of the outer ears with the same zigzag stitch. (See picture.)


Step 3: Sew the eye and nose pieces

Switch your thread color to black in the sewing machine.

Position and pin the black eye pieces onto the white face. Sew around the edges with a zigzag stitch, using black thread. I use a width of 5 and length 3 for most of the eye, but I narrow the width to a 3 at the outer points to help them taper nicely. (See picture.)

Step 5: Position the black nose onto the face and sew it into place with zigzag stitch.


Step 4: Hand embroider the facial features

Transfer the embroidery pattern to the fox face using your preferred method. I like to use water-soluble stabilizer. I use an ultra-washable Crayola marker to draw the pattern onto the stabilizer. Then I pin the stabilizer to the hat for stitching.

I embroider the face as follows:

Nostrils: First do a vertical satin stitch with light grey embroidery floss, 4 strands. Then underline the nostrils with split stitch, using 2 strands of white.

Nose detail: The long white line curving across the top of the nose, and the white line that goes vertically between the nostrils: Do both of these with 2 strands of white floss in split stitch.

Eyes – white sections: Sew the white highlights in the eyes and the white edges around the iris. Do both of these with 4 strands of white floss in satin stitch.

Eyes – iris: Use 2 strands of greenish-yellow floss and 1 strand of orange-brown floss. Stitch the iris with satin stitch. Your stitches should radiate out from the center, as shown in the picture below.

Under-eye outline: With 2 strands of black, sew a split stitch along the line just below both eyes.

Mouth: Sew the mouth with 4 strands of black in split stitch.

Tongue: With 4 strands of pink or red floss, sew the tongue with satin stitch.

When the embroidery is finished, dissolve the water-soluble stabilizer if you used any. Let the piece air dry overnight. Don’t try to put it into a dryer, because you risk the fleece edges coming apart.

Step 5: Sew the fox ears and the ear flaps

With right sides together, sew the fox ear fronts and backs together along the tops and sides with 1/4″ seam. Leave the bottom edge open. (Fox ears are the ones in the top of the picture.)

Also sew the ear flap fronts and backs together with right sides together, leaving the flat top edge open. (The ear flaps are the ones in the bottom of the picture.)

Turn everything right side out.


Step 6: Sew the outer pieces together

With right sides together, sew the outer front piece and outer back piece together along the sides and top with a 1/4″ seam. Leave the ear edges open, and leave the bottom open. I marked the edges you should sew with green in the picture.

(Warning: Make sure you’re sewing a BACK piece to your front embroidered piece. I once accidentally sewed the front liner to the front embroidered piece, and the subsequent seam ripping I had to do was the pits.)

Next, insert the fox ears inside the outer hat so that the ear fronts and the embroidered face are facing each other. Make sure the left ear and right ear are on the correct sides, so they point out and away from each other. See the pink arrows in the picture for guidance.


Once the ears are inserted, their bottom edges should stick out about 1/4″ past the hat’s opening. Sew in place 1/2″ from the edge of the ears (which is 1/4″ from the edge of the hat opening). You may need a long stitch length due to the number of layers for this stitching. I use length 4.

Confirm the stitching caught all layers and that no restitching is needed. Once that is confirmed, trim the excess seam from the ear bottoms. It should look like this after trimming.

Turn the outer hat right side out.


Step 7: Piece together the hat liner

With their right sides together, sew the front liner to the back liner. IMPORTANT: This time, you are sewing different edges than you did with the outer pieces! Only sew the sides and the ear edges together. Leave the top of the head open, and leave the bottom edge open. I’ve marked the edges to sew with green in the picture.


Step 8: Piece together the brim and ear flaps

With right sides together, pin the brim to the brim liner along their bottom edge. Insert the ear flaps between the brim and liner, as shown in the picture. Use the notches to line up the ear flaps where they belong. The ear flaps should be positioned so that they stick out 1/4″ past the edge of the brim seam.

Sew everything together along the brim bottom edge, as shown in the picture above. Use a wide zigzag stitch, so the brim keeps its stretchiness. I used a zigzag with width 3, length 4.

Step 9: Sew the brim into a circle

Next, open the seam you just stitched, so that the brim and brim liner are separated and lying flat. Fold the whole thing in half lengthwise, bringing together the short ends with right sides facing. Sew the ends together 1/4″ from the edge with a straight stitch, as shown in the picture here.


Step 10: Attach the brim to the hat

With right sides together, pin the brim to the bottom edge of the outer hat, lining up notches and seams. The brim seam from step 9 should line up with the hat’s back center notch. Sew all the way around with a zigzag stitch 1/4″ from the edge. I used zigzag width 3, length 4.

At this point, the hat should look like this with the brim unfolded all the way down:

Step 11: Attach the liner to the hat

With the hat liner inside out, pull the liner over the outer hat and line up the brim edge with the liner’s bottom edge. The hat and its liner should be right sides together.

You can pull the hat’s ears up through the hole in the top of the liner to help the fabric lay flat. (See picture.) Pin the brim to the liner, lining up notches and seams.

Sew around the hat with a zigzag stitch 1/4″ from edge, attaching the brim to the liner. I used zigzag width 3, length 4.


Step 12: Close up the liner

Pull the hat completely right side out. Push and pull on corners to help the seams flatten out. It will look like this.


Now double check that there are NO MORE PINS hiding in the fabric!! Once the coast is clear, fold the edges of the liner opening under 1/4″ and sew together as close to the edge as possible. Give a light tug after sewing to make sure the liner is completely closed and that no little holes remain.


Step 13: Finishing touches

Push the liner up inside the hat. At this point, you can call the project finished and get on with life, or you can do the final step that I like to do to secure the liner inside the hat.

With a regular sharps needle and black thread, I throw a couple hidden stitches right on top of the brim seam at the front center and back center.

Phew, you did it! I think my favorite part of this hat sewing pattern is how easy it is to tweak it into just about any animal. Simply change the eye, nose, and ear shapes, and use a different color felt. I’ve made a few birthday presents for local friends’ kids, where I even tailored the hat to look like their pet cat or dog. So much fun!

Even our family dog approves of the fox hat!

Frizzy Flower Appliqué Pattern for Kid’s Shirt

appliqué pattern instructions

My 6 year old made a crazy ton of tie-dyed t-shirts at summer camp this year. I snagged this one and spruced it up with a raw-edge flower appliqué design. I think the appliqué’s fraying edges and purposely crooked stitching works well with the tie dye pattern.

Of course, you don’t have to put this appliqué over tie dye. If you do want to, then the shirt pictured here has a single-color spiral tie-dye pattern, where the middle of the spiral is centered slightly higher on the chest. I’m pretty sure there are 10 bajillion tutorial videos on YouTube explaining how to do that, so I’m gonna leave those instructions to the dye masters of the universe. Once you’ve got your shirt ready, come on back here for the appliqué part.

All set? Great. Let’s get to the good stuff then.

Materials Needed

The PatternDownload the printable pattern here! As printed, the finished applique is 9.25″ tall and 6.5″ wide.

T-shirt (or whatever item you want to sew your appliqué onto) – The shirt pictured here is your basic Hanes white t-shirt that was then dyed. I used a child size small.

appliqué pattern choosing fabric
The four bottom fabrics blend nicely for the spiral pattern in the flower petals. The green fabric provides contrast for the leaves and stem.

Fabric scraps in 5 different colors/patterns – I used quilting cotton scraps, which are guaranteed to fray around the edges after a few washes. One of the fabrics should be green or brown for the flower stem, leaves, and center. The other four fabrics are for the flower petals. In choosing my own, I wanted these fabrics to have a color scheme that transitions well from one color into the next as it moves around the flower.

Thread in 2 colors – I use regular all-purpose thread, not embroidery thread or string. Choose colors that will pop and be obvious against the fabric. One color will be for the stem/leaves and flower center. The second color will be for the petals.

Fabric marker or chalk – Believe it or not, I use Crayola Ultra-Washable thin markers for almost everything I do. The stuff is magic. Easy to write on fabric with. Shows up well. Inexpensive. And it washes out without a trace 99% of the time. (PLEASE do a test swatch first, though, to make sure it washes out for you before you mark up a huge project with it!)

Elmer’s glue stick (optional) – I use this to hold the fabric layers together temporarily while I sew them together. I don’t mind the glue, since I’m sewing by hand. If you don’t have glue, you can use safety pins as an alternative.

Embroidery hoop (optional) – Again, you only need this if you’re sewing by hand, and even then, it’s optional but recommended. I find the hoop makes the sewing easier and faster.

Skip the fabric interfacing – While typically I’d use and recommend fusible interfacing in a project like this, I purposely skip it here. I WANT the edges of my flower to fray as part of this pattern. Interfacing will stop or at least limit the fraying, so I don’t use it here.

Prepare Your Materials

Step 1:

First, throw all your fabric (including the t-shirt) into the washing machine and dryer to pre-shrink it. Don’t skip this step.

While you’re waiting for your fabric to wash and dry, print the 3-page pattern and cut out the pieces on pages 2 and 3. Cut those pieces out along the solid lines. Leave the dotted seam lines alone. Also, don’t cut anything on page 1. You’ll want that page intact later on.

appliqué pattern instructions

Step 2:

Now it’s time to cut your fabric. Place your fabric right-side down. Then place your pattern pieces printed-side down on the fabric. (See image A.)

Trace around the pattern piece with your fabric marker. (See image B.) Cut out the fabric along the line you just traced.

Now take the SAME pattern paper you just used. Originally you cut it out along the solid cut lines, right? Now cut the paper again, but this time cut along the dotted seam lines. (Note: the outside edge of the petals don’t have dotted lines to cut. That’s on purpose.)

Put the newly-trimmed pattern paper back onto the fabric piece you cut. Align it so the petal’s solid-line outer edge matches the edge of the fabric. (See image C.)

Mark the seam lines on the wrong side of the fabric as shown. You can draw a solid line onto your fabric, but I think making dots is better. Dots are less likely to soak through to the right side of the fabric. (See image D.)

In the image above, you’ll notice that I also use my marker to write each petal’s letter on the wrong side. This is just to keep myself from losing track of the pieces. Only do this if you are POSITIVE your mark will wash out and/or not be visible on the right side of the fabric.

appliqué pattern instructions

Step 3:

Time to sew the petal pieces together! Using page 1 of your printed pattern as a guide. you will sew petal A to B, then B to C, then C to D, and so on.

I hand sew the seam lines with a backstitch. You can use a sewing machine here if you want, but personally I find I have better control matching up the pieces precisely when I do it by hand.

With right sides together, match up the pieces so that the top/outer edge of the two petals align at the intersection with the seam line. It’s important to understand here that the petals will ONLY align at this intersection. Let me explain…

Look at the close-up image here. The seam-allowance edges meet up along the green dotted line (green arrow). That part is pretty straight forward. But equally important is the top edge of the petals (or the edges that will become the outside edges of the flower itself.) Look at the dotted yellow line. The yellow arrow marks the point along this dotted line where your seam intersects. As you move left of the yellow arrow, the blue petal edge extends up higher than the purple petal. As you move right of the yellow arrow, the purple petal extends up higher than the blue petal. It is only at that 1/4-inch seam intersection where they meet exactly.

To recap that somewhat confusing paragraph: line up the petals’ seam edges (green dotted line) so they meet. THEN move one of the petals up or down until the upper edges meet at the seam line (yellow arrow point). This is where you want to start sewing.

appliqué pattern instructions

Sew your backstitch along the dotted line you marked on the petals, keeping 1/4″ seam the whole way down. As you sew, you will need to curve and reposition the petal edges to keep them even with each other. (See images A through C.) When you reach the end of a seam line, open the petal flat (image D) and repeat step 3 with the next petal piece.

Do step 3 for each petal piece until the entire flower is sewn together. Don’t worry if any of your petals end up longer or shorter than the rest at the center, since the middle of the flower will be covered up anyway. It’s more important that the outer edges line up correctly.

appliqué pattern instructions

Step 4:

Once all your petals are sewn together, press the seams flat as shown. Iron from the outside of the flower toward the center, gently guiding the center point to overlap its seams as flat as possible.

appliqué pattern instructions

Step 5:

Turn your ironed flower over so the right side faces up. Trim around the outside of the petals in any spots where seam allowance sticks out. You want the petal curves to be as rounded and clean cut as possible, because these raw edges will show in the finished piece.

In the image here, I cut everywhere there is a dotted yellow line.

appliqué pattern instructions

Step 6:

Hey, remember in step 1 that I told you to leave page 1 of your pattern uncut? This is why.

Place piece J of your pattern (the stem and leaves) onto your printed pattern and line it up. With your glue stick, put a dab of glue on the top 1/2 inch of the stem on the right side of the fabric.

Place the flower petals over piece J, as shown, also lining up the petals in their respective places. (In other words, petal A is in the petal A spot. Petal B is in the petal B spot, etc). Press firmly where you put glue at the top of the stem to attach the petals to the stem.

With your glue stick, add glue to the wrong side of the fabric on piece I (the flower’s green center circle). Put piece I on the center of the flower and press firmly to attach it to the petals.

Remove the fabric from the paper before the glue dries fully, in case any got onto the paper.

appliqué pattern instructions

Step 7:

With your glue stick, put a few dabs of glue on the wrong side of the fabric flower. Then position your flower about 1 to 2 inches below the neckhole and press it firmly to help the glue adhere. In the picture here, the flower is 1.5″ below the neckhole. (That 1.5″ includes the ribbed fabric around the neck.)

You do NOT need a ton of glue here. Ultimately, the sewing will hold your flower in place and the glue will wash away in the laundry. So just use enough in key spots to help the fabric stay in place while you sew. If you overdo it with glue, you’ll find it difficult to pull your needle through the glued fabric.

appliqué pattern instructions

Step 8:

With two strands of thread, sew a running stitch in a spiral on the flower’s center circle. Start at the outside and sew inward to the center of the spiral. Leave 1/4″ of fabric unsewn around the outer edge. Do not tie off your thread yet. (See image A.)

When you reach the center of the spiral, sew back out with another alternating running stitch to fill in the gaps. (See image B.)

In sewing this, the goal is to have NO knots on the inside of the shirt. A knot inside a shirt equals chafing or, at the very least, itchiness. Anytime you need to end a thread, take advantage of your raw edges and applique layers to hide the knot. For example, the thread in the flower’s center is knotted ABOVE the petal fabric but UNDER the green center. (See image B, where the yellow arrow points to the knot.) After making a knot, I hide the excess thread by inserting the needle under the green fabric (still above the petal fabric) and bring it up again about 1/2 inch away. (See image C.) Once the thread is drawn up snugly, I cut any remaining thread off right against the fabric (being careful not to cut the fabric itself.)

(Side note: This goal of comfort inside the shirt is also why I choose the double running-stitch method instead of a backstitch. It leaves less thread overlap inside the shirt.)

appliqué pattern instructions

Step 9:

Sew the leaves and stem with the same running stitch method done in step 8. Begin at the base of the stem and sew a running stitch up and under the flower petals. Then sew back down to the stem’s base along the same stitch line, filling in the gaps. Go up and down the stem this way a total of three times, intertwining your stitch lines randomly. Remember to leave unsewn fabric along the stem edges for fraying. (See the top left and top right pictures.)

When you’ve finished the stem and are back at the base, begin to sew a running stitch around the edge of one leaf, 1/4 inch from the edge. When you’ve returned to the stem base, sew around the same leaf a second time with an alternating running stitch to fill in the gaps. Do the same with the second leaf. (See top right image.)

Last but not least, sew the topstitched curly lines inside the leaves. You can lightly mark the lines with chalk or washable marker, or you can freehand it. (I did not use my Crayola marker here, because I was nervous it wouldn’t wash out. Instead, I used fabric chalk.)

As before, start at the stem base, sew a running stitch along the path, and then sew back along the same path with an alternate running stitch to fill in the gaps. Do the same to the second leaf. (See bottom image.)

appliqué pattern instructions

Step 10:

It’s petal time! Do a running stitch around the outside edge of the petals, leaving 1/4 inch raw fabric along the edge. IMPORTANT! When you do this first running stitch, do NOT sew all the way to the center green circle. Instead, stop and turn the corner when you reach the next petal, always remaining 1/4 inch from the outer edge. (See image A.)

Once you’ve sewn around the petals once, go ahead and sew the second running stitch along the same path to fill the gaps. Except THIS time, when you reach that corner where two petals meet, keep sewing a running stitch down to the center green circle. Keep sewing your running stitch under the green fabric until you reach its seam. Then reverse direction and sew back up, filling in the running stitch gaps. Continue like this all the way around the flower. (See image B, where the yellow arrows show the path that you follow this second time around the flower.)

Image C here shows what the flower looks like with a completed round of doubled running stitch. Once this is done, repeat step 10 a second time, randomly interweaving your stitching lines. Image D shows the flower after both rounds of doubled running stitch are finished.

That’s the whole shebang! If you’re curious, here is what the inside of the shirt looks like when I finished it. As you see, there are no knots anywhere, just single lines of stitching. The thread softened up nicely after a round in the laundry, so it ended up quite comfortable to wear. That being said, if you do find that the inside of your shirt seems uncomfortable, I recommend ironing a large piece of single-sided interfacing over the finished inside stitching. This can help minimize the feeling of thread against skin.

appliqué pattern instructions

Did you use this pattern? Let me know what you thought in the comments below!

free t-shirt appliqué design for kids

Dinosaur & Flower Balloon: Appliqué Pattern

free applique pattern for kids shirt

I’m still on my sewing kick lately, churning out clothes for my kids. I’ve had this bright pink t-shirt in my “might use this someday” craft bin for a couple years, so it was time to transform it into something with more personality. I drew this whimsical appliqué pattern of a dinosaur holding a flower-like balloon. The design was initially for my 2 year old who is obsessed with dinosaurs, but her older sister saw it, fell in love, and begged me for it. I figured why not? It will eventually make it to my 2 year old as a hand-me-down anyway, right?

The pattern uses three types of hand-worked stitches. The vast majority of it takes a buttonhole satin stitch to attach the appliqué and fill in some of the facial features. There is a small amount of invisible backstitch under the mouth — I will talk about this more later — and lastly, the balloon string is done with an embroidered stem stitch.

The finished size of this pattern as it exists in the printable PDF is about 8.5 inches wide by 9 inches tall. If you decide to resize the pattern, I recommend making it bigger, not smaller. Trying to shrink the pattern size will cause some of the fabric detail to become too delicate and frayed (for example, the eyes and the smallest back spikes).

Materials Needed for This Project

Shirt or other item to put your appliqué on – After all, you need a canvas for your appliqué project!

Fabric – I used leftover quilting cotton fabric scraps from older projects. Ultimately, you can choose whatever fabric scheme you like, but I opted for variety with no fewer than 5 separate fabrics.

Fusible Interfacing – I don’t bother with double sided fusible interfacing, because I just safety pin my pieces right to the shirt. It’s important to use at least single-sided interfacing here, though, especially on the really small pieces like the eyes. Otherwise your fabric will fray too much during sewing.

Thread – I used 5 different thread colors: color A matches the main body; color B matches the back spikes and flower petals; color C matches the center of the flower; white thread encircles the eyes; and black thread makes up the mouth, nose, eye pupils, and balloon string.

Pattern Click here to download a one-page printable PDF of this free appliqué pattern.


Project Instructions

applique interfacing on fabric

Step 1: Fabric preparation

As always, make sure your fabric is pre-washed and shrunk in the dryer before you cut ANYTHING.

Cut some squares of fabric that are just big enough for your pattern pieces. Cut squares of fusible interfacing to the same size, and iron the interfacing to the wrong side of your fabric squares, as shown.

In the picture here, the green fabric square will be the dinosaur’s main body. The grey-blue square in my hand will be the dinosaur’s back spikes, arms, and legs. The smaller blue square will be the flower petals. Then the very small brown square will be the flower’s center circle. The smallest white rectangle will be the dinosaur’s eyes.

applique flower

Step 2: Sew the flower pieces together

Before I sew anything to the shirt, I piece together as much of the dinosaur and flower as I can. The flower only has two pieces — the petals and the center — so I knock this one out first.

Note: I use two strands of regular sewing thread for all stitching throughout this project. Strands of embroidery thread should work just as well, if that is your preference.

With a buttonhole satin stitch, sew the flower center on top of the petals, as shown. I like to go around once leaving gaps between my stitches. (See top picture to the left.)

Then I go around a second time filling in the gaps. This way helps me to ensure a smooth, round transition in the angles of the stitches. (See bottom picture to the left.)

Notice that when I reach the gaps in between the petals, I don’t skip the fabric. Instead, I continue my satin stitch on the center circle only until I reach the next petal.

dinosaur applique pattern instructions

Step 3: It’s the dinosaur’s turn!

Sew the eyes and single arm to the top of the dinosaur body with satin stitch, as shown in the top photo. Important! Especially when you place the eyes, don’t forget to leave untouched fabric along the edge of the dinosaur’s head and body. You’ll need this later when you sew the dinosaur to the shirt.

Once the eyes and arm are attached, position the dinosaur’s spikes and remaining limbs under the body, as shown in the bottom photo. Sew along the dinosaur’s back, attaching its body to its spikes, as I did with green thread in the bottom photo here. Important! When you reach the spaces between each spike, do NOT sew around the edge. Instead, skip to the next spike with your satin stitch. (Yes, this is the opposite of what you did with the flower above.) You’ll need these gaps later to sew the dinosaur to the shirt.

Lastly, place the dinosaur’s remaining leg on top of its body and sew it down with satin stitch. Only sew the edge of the leg with body underneath it. Leave the bottom part of the leg untouched for now, as shown.

When you finish this step, the dinosaur will not have any stitching around either foot, and only one of its arms will be sewn to the body. This is on purpose.

dinosaur applique pattern

Step 4: Draw the facial features

Before you start to sew here, I recommend you draw the dinosaur’s eye pupils, nostrils, and smile to make sure you like their placement.

You can do this with sewing chalk, but I personally love to use my kids’ Crayola ultra-clean washable markers. They are cheap to buy. They come in a bajillion colors, so I can easily match them to my fabric. And without fail, they always wash out completely when I put the finished project in the washing machine. The only downside is that my kids keep stealing my marker stash from me. Yeesh.

Of course, if you decide to go the marker route, I still recommend you do a spot test and wash to be safe. I don’t want to be the reason your project ends up with permanent ink stain!

embroidery on dinosaur applique

Step 5: Sew the eyes and mouth

I sew the eyes and mouth using the same strand of thread. I start with the eye on the left, satin stitching the pupil. Then I do the eye on the right. From there, I jump straight down with my thread and sew a backstitch line along the smile. (See top photo.)

The reason for the backstitch is to give some shape and lift to the mouth, especially in the narrow area where the smile turns upward.

Satin stitch the mouth over the backstitched line. The widest part of the stitching on the left of the mouth should be just over 1/8″ tall. You’ll notice in the bottom photo that I left a few gaps in the satin stitch on the far left of the mouth. I will fill these gaps in later when I sew the dinosaur to the shirt.

As you sew the mouth, gradually taper the width of the satin stitch until it wraps snugly around the end of the backstitch. (See bottom photo.)

 
embroidery on dinosaur applique

Step 6: Nostrils!

Sew the nostrils (or, as I like to call them, the “nose holes”) with satin stitch.

kids shirt applique pattern

Step 7: Pin appliqué to shirt

Before you actually pin the applique to the shirt, make sure you have washed and pre-shrunk the shirt. If you are sewing onto a knit fabric (aka, stretchy fabric like my t-shirt here), I also recommend you iron some fabric interfacing to the inside of the fabric to stabilize it.

Pin the pieces to the shirt and make sure you like their arrangement. Do your best to center the overall image horizontally.

The top of the flower should be between 1 to 1.5 inches below the neck hole. The bottom edge of the flower will align with the top of the dinosaur’s head (the top of the green head, that is, not the spikes).

 
dinosaur appliqué finished pattern

Step 8: Sew the applique to the shirt

I put my shirt into a 10″ embroidery hoop to stabilize it while I sew. If you do this, be careful not to stretch the shirt fabric in a way that distorts it.

With the exception of the balloon string (which I sew last), everything from here out is done with a buttonhole satin stitch. This is the order in which I sew the applique edges to the shirt…

  1. Flower petals – blue thread. This is all you need to attach the flower. You will not add any stitching to the center circle. Only the blue thread around the petals is needed here.
  2. Dinosaur body – green thread. Sew the green thread around the main body section. I recommend you start at the top of the mouth and go up and over the head. Work your way down the back and fill in the gaps between the spikes. (Do not sew around the spikes themselves.) Then sew around the tip of the tail, down the belly, and back up to the chin. (Do not sew over the front leg or the bottom of the mouth.)
  3. Spikes, remaining arms and legs – blue thread. Sew these sections as shown in the photo above.
  4. Mouth – black thread. Remember when you left a few gaps in the widest part of the mouth? Fill those gaps in now to attach the bottom of the mouth to the shirt.
  5. Balloon string – black thread. Before I sew the balloon string, I draw in a path with one of my Crayola washable markers. You can also use marking chalk or even a regular pencil — but be careful not to damage the fabric itself. Then I sew along this path with a stem stitch.

As I do all the sewing in this list, I end all threads by weaving them under the satin stitches. Knots will make the shirt uncomfortable to wear. If it seems like the threads on the inside of the shirt will be itchy or bothersome, you can also iron another layer of soft interfacing over the stitch work on the inside of the shirt when you’re done.