How to Paint Fabric with Freezer Paper — Tutorial & Free Cricut Pattern

If you aren’t already using freezer paper for your fabric paint projects, then I’m about to make your day. Today’s post is a combo deal: a free Cricut pattern AND a fabric painting tutorial.

I’ve been on the freezer paper train for over a year, and I just can’t stop finding new things to paint. From shirts to bags to costumes to bookmarks, I just want to attack everything in my house with freezer paper and fabric paint. And while I use (and highly recommend) a Cricut to cut your freezer paper, you CAN do this project with a regular crafting knife, too.

For the Cricut pattern, I drew this upbeat design to put on one of my new t-shirts. Whenever I’m wearing something silly like my mustachioed face mask, I’ve found that people will spontaneously smile and make lighthearted comments when I pass them in the store. Especially in the past couple years of the pandemic, I’ve found myself appreciating these quick moments of camaraderie with total strangers. It’s with this in mind that I made this t-shirt design.

Here’s What You Need to Paint Your T-Shirt

To complete this project, you’ll need the following materials and tools…

  1. Design for Your Freezer Paper StencilYou can download the JPEG of my “Free Smiles” design here.
  2. T-shirt — The fabric of your shirt WILL affect the quality of your finished paint job. I cannot stress this enough. I’ll go into brand and fabric recommendations in the next section.
  3. Fabric Paint — I’ll talk about brands and recommendations for fabric paint and fabric ink in the next section, too.
  4. Sponge brushes — Buy enough sponge brushes so that you have a different brush for each paint color.
  5. One flat-edged paint brush — This is optional, but highly recommended. I’ll explain how I use this in combination with the sponge brushes to control my paint flow.
  6. Freezer paper — Freezer paper is the same as wax paper with one important difference: the wax is on only one side of the paper. Do NOT try to use wax paper instead! You will wreck your iron. You can find freezer paper at most grocery stores. I buy mine at Walmart.
  7. Heat transfer tape — This will help you transfer your design in one piece from your Cricut mat to the t-shirt. Do NOT use regular transfer tape! It will melt and ruin your iron. I haven’t been able to find this stuff locally, so I use this heat transfer tape from Amazon. It’s not too expensive, and you can reuse the same piece numerous times before it loses its adhesion.
  8. Cardboard, brown paper bag, etc. — You’ll need something to put inside the shirt when painting, to ensure the paint doesn’t soak through to the back of the shirt.
  9. Iron — You’ll use the iron to adhere the freezer paper to the shirt. You’ll also use it to heat-set your fabric paint at the end of the project.
  10. Sewing pin and tweezers — A sewing pin helps to remove the freezer paper from the shirt at the end of the project. I also use these to weed my Cricut mat.
  11. Cricut and Standard Grip (green) Cricut mat OR a craft knife — If you don’t own a Cricut, it’s possible (albeit VERY time-consuming) to cut your stencil with a craft knife instead. My first freezer paper project was done with a craft knife, and it’s the reason I immediately ran out and bought a Cricut afterward.

Advice on Choosing Your Shirt and Fabric Paint

I could easily fill two more blog articles with this topic, but I’m going to oversimplify things to help you get to painting faster.

Choose Your Shirt Wisely: Texture Matters!

When it comes to your fabric, texture is the enemy. This is because t-shirt fabric stretches, but dried fabric paint will not stretch. If your shirt has even a little texture, that can cause cracks to appear in your paint when the fabric stretches. On the other hand, if your shirt is smooth, the fabric will hold the paint more consistently across the design and cracks will be far less likely.

Your best friend will be shirts made from ringspun cotton rather than regular cotton. I’ve also had good experience with cotton/poly blends. My favorite brand is Gildan Softstyle, which is a ringspun cotton shirt. I’ve also had success with Bella+Canvas (this is what I’m using in the pictures), but this brand can get a bit pricey. And for kids’ shirts, I have to give a shoutout to Walmart’s clothing brand called Wonder Nation, which has given me consistently fabulous results.

As for shirts to avoid, I’m going to list just one: Do not, do not, DO NOT use Gildan’s regular short sleeve cotton or cotton/poly t-shirts. I mention this brand, because it’s one of the most popular ones found on the shelves at big-box craft stores. The slight diagonal texture in the woven cotton does not take paint well. Trust me. I learned this the hard way.

Choose Your Paint Less Wisely

As for fabric paint and fabric ink, I’ve used them both. No, please don’t ask me to explain the difference between them, because I haven’t been able to find one. They both work equally well for me.

I’ve used the following paints and inks with similar success: Tulip Soft Paint, Scribbles 3D Dimensional Paint, and Fabric Creations Soft Fabric Ink. I’ve also used Tulip Slick and Tulip Matte and been reasonably satisfied with the results, though I find these last two can be a bit stiffer and more likely to crack on t-shirt material. (The black paint in this tutorial is Tulip Slick, and the purple paint is Fabric Creations Ink.)

Finally, I recommend that you either 1) avoid glitter, or 2) add glitter as a second layer of paint over a color you like. Inevitably, the glitter WILL wash away with repeated use. I personally opt for the latter method, because my girls love glitter so much. When it eventually washes away, the shirt still retains the color layer and looks okay.

How to Paint Your T-Shirt with Freezer Paper

Step 1: Prepare Your Freezer Paper Stencil

First, snag the JPEG of my “Free Smiles” design here, or use another design of your choosing. If you’re using a Cricut, upload your pattern to the Cricut Design Space. When you upload the JPEG file, choose to remove the black parts of the image, not the white section.

Once your design is placed on your Design Space Canvas, select the entire image and resize it to the correct width, depending on your shirt size. See the chart above for recommended image width. The shirt I made myself is an adult unisex XL, and I sized my image to 9″ wide.

Next, create a rectangle on Design Space that is 1.5″ taller and 1.5″ wider than your design. This will be the outer edge of your stencil. (Note: the rectangle can’t be bigger than 11.5″ x 11.5″ to fit the Cricut mat, so it’s okay if you have to make your rectangle smaller to accommodate those dimensions.)

Select the entire image on Cricut Design Space, including the rectangle you just made, and click the “Attach” option.

free cricut pattern for shirt

With the wax side (the shiny side) of your freezer paper facing down, cut your stencil with your Cricut or craft knife. Take the time to really adhere your freezer paper to the Cricut mat, because the wax paper can easily slide and ruin the cut if not pressed down well.

Weed out the unwanted parts of your stencil from your mat. Instead of using the pricy Cricut-brand tools, I prefer to remove the stencil pieces with a sewing pin and a pair of needle-nose tweezers.

Step 2: Iron the Freezer Paper to Your Shirt

free cricut pattern

Using heat transfer tape, remove the freezer paper stencil from your Cricut mat and position it on your shirt, wax side down. Use the same size chart from above for the correct distance between the shirt’s neck hole and the topmost part of the design.

As I mentioned up above, I’ve struggled to find decent heat transfer tape locally. It isn’t sold as a stand-alone item in Cricut aisles, unfortunately. Luckily, I came across this fantastic heat transfer tape on Amazon. This stuff is SUPER sticky and will hold onto your freezer paper without any trouble. Since it’s clear, it’s easy to confirm that your image has been positioned correctly on the shirt. And my favorite part — when the iron heats it up, it magically loses its adhesiveness and releases the freezer paper without any issues or tears. Then it cools back down and gets sticky again to be reused on a later project. I bought a 10-foot roll of this stuff, and over a year later, I’m only halfway through the roll even though I’ve made about 40 different freezer paper projects. (For the record, I’m not paid or given any freebies to say this. I just truly adore this stuff.)

free cricut tshirt design

Okay, back to instructions. Iron over the transfer tape until the freezer paper stencil sticks to your shirt. Remove the transfer tape and store it for later reuse, if possible. Then iron over the freezer paper once more, giving special attention to smaller pieces (for example, the hole inside the uppercase “R”).

Cut another rectangle of freezer paper the same size as your stencil. Place it inside the shirt with wax side up, and iron it to the fabric so that your t-shirt fabric is sandwiched between the two pieces of freezer paper.

Now you’re ready to paint!

Step 3: Paint Your Shirt

free tshirt stencil for cricut

Place a brown paper bag or piece of cardboard inside the shirt to protect the back of it while you paint.

Using a sponge brush, paint your shirt with fabric paint or fabric ink. Dab the sponge brush straight down onto the fabric repeatedly — don’t drag it across the fabric. Make sure the paint fills in all crevices of the stencil, but don’t over-soak the fabric with paint. You don’t want it seeping under the stencil.

Tip: I squeeze the fabric paint onto a palette first, not directly onto the sponge brush. I then dip a regular flat brush into the paint and use that to apply fabric paint to the sponge brush. This gives much better control over the amount of paint on the sponge brush.

Only apply a second layer of paint if absolutely necessary. The thicker the paint is on the shirt, the higher the likelihood it can get cracks in it later. If you do need a second layer, wait until the first layer has dried; otherwise, you risk paint seeping under the stencil.

Step 4: Remove the Freezer Paper

freezer paper stencil

When the paint is dry, remove the freezer paper from the shirt.

Tip: By dragging a sewing pin lightly along the edge of the stencil, you can help to “cut” the paint and remove the stencil more easily. This is what I’m doing in the bottom image on the right.

You may find it easier to remove the freezer paper stencil when the paint is partially dry but not completely hardened. This requires extra care, because you run the risk of paint smearing onto other parts of the shirt while it’s still wet. If you do remove the paper while the paint is wet, leave the cardboard and second piece of freezer paper inside the shirt until the paint is completely dry.

If your kids are removing the freezer paper, though, trust me. Wait until the paint has dried completely.

Step 5: Heat Press the Paint

After the paint dries completely, wait at least 24 hours before heat pressing. Some fabric paints say to wait as long as 3 days, so check the paint bottle’s instructions. If the paint instructions don’t say anything about heat pressing, I still recommend you do this step.

To heat press, make sure all freezer paper, cardboard, etc. has been completely removed from the shirt. Iron the painted areas on a low-heat setting. If the iron is too hot, you can burn and discolor the paint. This step helps to seal the paint to the fabric, so it’s less likely to fade with multiple washings.

Step 6: Rake in the Compliments

When others tell you how much they like your shirt, smile widely and let them know you made it!

how to faux screen print

Did You Try Out This Free Cricut T-Shirt Design?

Let me know if you enjoyed this freezer paper tutorial. Has it changed your craft experience as much as mine? And as always, let me know in the comments if you have any questions. Happy painting!

Reversible Sun Hat Sewing Pattern, Part 3

This is the third and final part of my sewing pattern for a wide-brimmed hat for kids and adults. If you’re looking for the other sections of this tutorial, you can click here for part 1 or click here for part 2.


Next, Add the Felt to Your Liner

Continue using Thread Color B in both your main spool and your bobbin for steps 13 and 14.

Sun hat instructions

Step 13: Pin the felt pieces to the wrong side of your liner, as shown. The 3 felt pieces will overlap in such a way that each felt’s side edges will align with the brim’s pressed-open seams (see upper photo).

Once pinned, the felt’s inside curve should line up closely with the circular seam at the base of the crown. The brim’s outer edge will have about 1/4 inch with no felt on it.

Sun hat instructions

Step 14: With the felt still pinned in place, sew along the brims’s original seam lines, as shown. This will secure the felt to the brim in such a way that hides the stitching. Only sew along the brim seam. Do not sew onto the crown.


Time to Put the Two Sides Together!

For steps 15 through 18, use Thread Color A in the top spool, and use Thread Color B in your bobbin.

Sun hat instructions

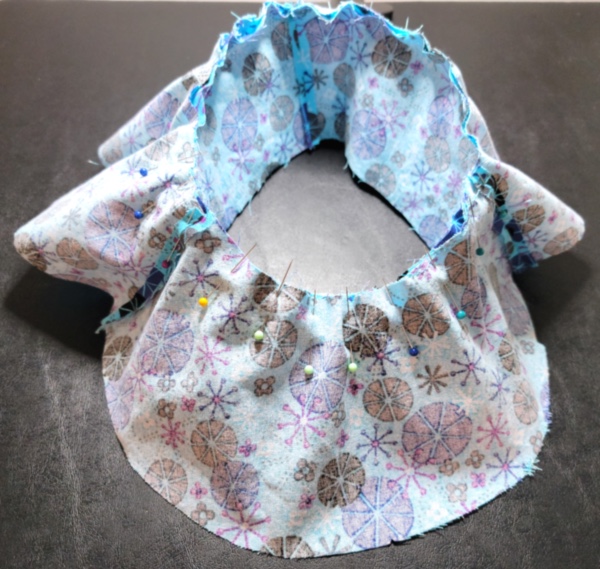
Step 15a: This is one of my favorite steps, because the hat really comes together here. Put the liner and the main fabric together with right sides together. Make sure you line up your brim seams and your loops carefully, and pin the two brims together around the outer edge.

Step 15b: Sew the liner and main hat together around the brim’s outside edge with 1/4 inch seam, BUT leave a 3-inch unsewn gap to the right of the brim’s back center seam. You will need this gap to turn your hat right side out!

Note that the gap should be just to the right (or the left) of the back’s center seam. Don’t leave the gap dead center at the back, because it can be tough to close the gap later when it includes overlapped felt and other seams.

Step 16a: Turn the hat right side out. Push out the brim’s outer edge as much as possible.

Step 16b: Now you need to close that gap. Start by folding your liner fabric over the felt’s curved edge, as shown in the top picture here, and pin it in place. I recommend placing a pin every 1/2 inch or so to help maintain a nice curved edge.

Step 16c: Fold the main fabric under and inside the brim, matching its curved edge with the liner as much as possible. Pin in place.

Notice in the bottom picture that I place perpendicular pins for step 16b, and then I use parallel pins for step 16c. I leave all these pin in, removing them only as the sewing needle approaches them in step 17. This helps me to keep a nice, gradual curve.

sun hat sewing pattern

Step 17: Topstitch around the outer edge of the brim, 1/8 inch from the edge. This stitching will serve the dual purpose of sewing the gap closed from step 16, as well as being the first round of quilt-like stitching to shape the brim.

Tip: Start and stop this round of stitching near the back of the hat, in order to keep the front brim looking neat and seamless. Do this for step 18, too.

sun hat free sewing pattern

Step 18: Continue to topstitch the brim in circles, as shown. Each round of topstitching should be 1/2 inch inward from the previous round. Stop when you are less than 3/4 inch from the crown seam.

Important! As you get close to the crown, be careful and hold the loops out of the way to avoid sewing over them. Don’t forget to avoid the loops on the underside of the hat, too!

Tip: I recommend holding the brim’s unsewn fabric and felt in place with pins while you topstitch. This helps to stop the fabric from falling out of shape or bunching.


The Final Touch!

sun hat sewing pattern

Step 19: Remember the two ties you made way back in step 1? Time to grab them and finish this puppy up.

There are two ways you can attach your ties to your hat. The first is simply to knot them on the loops, as shown in the top picture. When you want to reverse the hat, untie the ties and knot them on the loops on the other side of the hat.

The second method, which is my preference, is to add snaps to your ties. Attach the male end of the snap to the very end of a tie. Attach the female end to the same side, about 1 inch away from the male end, as shown in the bottom picture. Do the same to the second tie.

With this second method, you can use grommet snaps or sew-on snaps. I like to use sew-on snaps, especially when attaching them to multiple layers of fabric like this, because there is far less chance of messing up or damaging the fabric.


The only thing left to do now is enjoy a sunny day in your new hat! If you gave this pattern a try, share a picture in the comments below. And of course, don’t hesitate to leave a question if anything here needs clarification for you.

sun-hat-sewing-pattern-for-kids-adults

Reversible Sun Hat Sewing Pattern, Part 2

Welcome to part 2 of my sewing tutorial for a wide-brimmed, reversible sun hat with removable ties. If you haven’t already printed your pattern and cut your fabric, click here to hop over to part 1 of the tutorial.

Ready to start sewing? Let’s get going!

sun-hat-sewing-pattern-for-kids-adults
 

First, sew your lightweight fabric pieces together.

THREAD COLOR: For the rest of this pattern, “Thread Color A” refers to the thread that matches your lightweight fabric. “Thread Color B” is the thread that matches your medium-weight liner fabric.

For steps 1 to 11, use Thread Color A in both your top spool and your bobbin.

bias tape end finishing

Step 1a: Sew together your bias tape strips until you have two 30″ long pieces; then iron them into a double fold. This tutorial video shows you how to make double-fold bias tape.

Step 1b: To finish the ends of each bias tape strip, first unfold the strip’s end and lay it flat. Fold each corner toward the center so that the fabric ends in a point. Fold the point down, and then refold the original double-fold of the bias tape. Do this folding to both ends of the strip.


Step 1c: With the ends folded in, sew along your strips with a zigzag stitch. I use a width 2 (out of 5), length 3 (out of 5) zigzag stitch with my machine.

Once both strips are sewn, set them to the side. We’ll come back to these at the end for your hat ties.


Step 2a: Now grab the two rectangle shapes, which will be the hat loops for the removable ties. These are basically going to be folded and sewn like very short bias tape strips.

Step 2b: Fold both strips in half lengthwise and press with an iron.

Step 2c: Unfold the strips. Use the crease that you created with step 2b as a guide. Fold the sides inward so that the edges meet in the center, as shown in the picture. Do this to both strips, and press the new creases with an iron.

Step 2d: Fold both strips in half again along the original crease from step 2b. Sew along the length of the strips with a zigzag stitch, width 2 and length 3, same as you did with the bias tape in step 1b. However, this time do not fold under or finish the ends. Leave them raw.


Step 3: With right sides facing, sew the 3 brim pieces together with 1/4 inch seam. Press the seams open with an iron, as shown.

Step 4: With right sides facing, sew the 3 crown pieces together with 1/4 inch seam. Press the seams open with an iron, as shown.

 
sun hat instructions

Step 5a: Fold the brim in half with one of the seams at the folded edge. The other two seams will lie flat and overlap each other, as shown in picture 5a.

Step 5b: Fold the brim in half a second time, as shown in picture 5b. There are now 2 layers of fabric folded on the left side. Place a pin in each layer on the fold, as shown, with one pin on the outside of the fold and the second pin on the inside of the fold.. Do not pin the two layers together! The purpose of these pins is to mark the exact centers on the left and right sides of the hat. (Alternatively, you can also make a mark with chalk.)

Step 5c: Unfold the brim all the way until it is a full circle again. Using the pins from 5b as markers. attach the loops to the right side of the brim as shown. The 5b pin marker should be at the center of the loop.

 
sun hat instructions

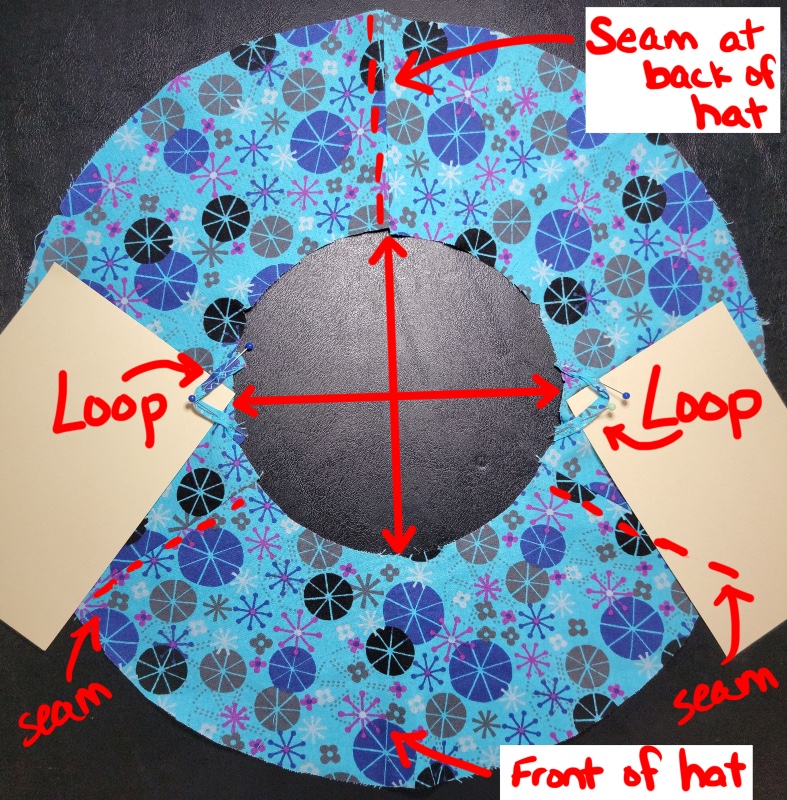
Checking in: This is how your brim should look right now. (I put some cardstock under the loops to make them easier to see.) Note that the back of the hat will have a seam, while the front of the hat will not have a seam. Keep this in mind as you start attaching sections in future steps.

Step 6: Sew 1/8 inch from the edge of the brim to attach the loops.

 
sun hat instructions

Step 7: Trim any excess loop so that its edges are flush with the brim’s edge.

 
sun hat instructions

Step 8: With right sides together, pin the LARGER side of the crown to the SMALLER side of the brim, as shown. Be sure to match seams and notches to each other. Sew around with 1/4 inch seam.

 
sun hat instructions

Step 9: Press the seam from step 8 up toward the crown and topstitch it down. Make sure to push the loops toward the brim so they don’t get caught under the stitches. The topstitching should go all the way around the base of the crown, 1/8 inch away from the seam.

 
sun hat instructions

Step 10: Pin the circular top piece to the crown with right sides together, as shown. The double notch on the top piece should line up with the seam on the BACK of the hat (not either of the side seams). The other 5 notches on the top piece should line up with the remaining seams and notches on the crown. Sew all the way around, 1/4″ from the edge.

Advice: By putting your pins on the crown side, not the top, you’ll find it easier to avoid accidental fabric bunching while you stitch. Go slow on this round. I recommend pausing frequently to re-straighten your fabric as you work your way around.

 
sun hat instructions

Step 11: Press the seam from step 10 toward the crown, and topstitch it down. Topstitch all the way around, 1/8 inch away from the seam.


Now it’s time to sew the liner!

THREAD COLOR: For steps 12 to 14, use Thread Color B in both your top spool and bobbin.

Step 12: Repeat steps 2 to 11 with your liner fabric. You will end up with the two halves of your hat, like the ones shown here.


You’re almost to the finish line now! Head on to part 3 of my sewing hat tutorial for instructions on how to put the remaining pieces together.

Reversible Sun Hat Sewing Pattern, Part 1

wide brim sun hat sewing pattern for kids and adults

I own this marvelous sun hat that I bought at The Gap about 20 years ago. It’s a little big for my head, but it’s comfortable. More importantly, it has this amazing wide brim to keep the sun off my face, neck, and chest when I’m working in the mid-day heat. I’ve wanted to get similar hats for my kids, but I simply cannot find a reasonably priced hat that 1) fits their heads comfortably, 2) has a wide brim all the way around, 3) has a tie to keep the hat from blowing away, and 4) comes in a color or pattern that my kids will wear willingly. (That last one is extra tough when it comes to my teenage son!)

old sun hat
My 20-year-old sun hat really needed a replacement.

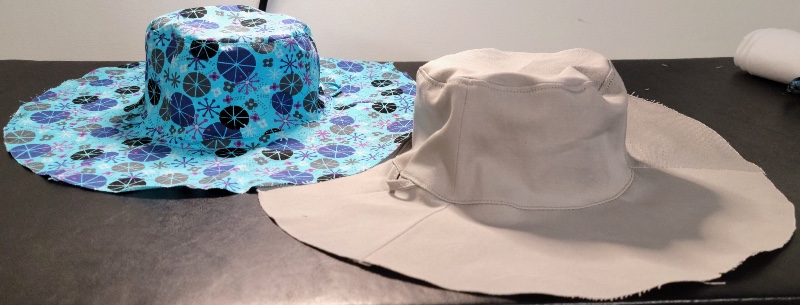
So I finally gave up and decided to make a hat pattern using my old hat as inspiration. The old hat was built from two half-circle arcs to create the brim. I opted to break the sides and brim into thirds, which makes it easier to use fabric with a directional pattern. The old hat didn’t have ties, either, so I added loops. This way, a tie can be added or removed, depending on how windy the day gets. Having loops instead of sewing the ties directly to the hat also makes it possible for the hat to be reversible.

Finally, I faced my biggest challenge: how could I give the hat a nice wide brim for sun protection, without the brim flopping down and covering the eyes? This was my biggest beef with my old Gap hat, actually. The solution came to me while I was organizing my kids’ craft bin. Felt! When I added a layer of inexpensive craft felt to the hat’s brim and then top stitched the brim in a faux-quilted method, the hat ended up with a Goldilocks “just right” balance of stiffness and floppiness.

And voila, the new sun hats are perfect! They came out so well, in fact, that other moms at the playground have been stopping me to ask where I bought them. I feel like one of the best compliments a seamstress can get is when people can’t tell your work is home made.


Prep Your Sun Hat Project: Tools & Materials Needed

  • Difficulty level: Intermediate
  • Total Cutting & Sewing Time: About 3.5 hours

You don’t need a lot of extra sewing notions for this project. Along with your sewing machine, pins, and tape measure, you’ll need the following materials…

  • Patterned side: 1/2 yard lightweight fabric. I use cotton quilting fabric. Two fat quarters of fabric can work just as well as a complete 1/2 yard piece.
  • Solid side: 1/2 yard medium-weight fabric. I use a polyester-cotton-blend twill fabric (the type that khaki pants are often made from).
  • Sewing thread in two colors, one to match each fabric. (As an alternative, you can use one color thread that matches one fabric and works as a contrast against the second fabric.)
  • Crafting felt – I use plain white felt. Three pieces of standard 9″x12″ craft felt will be plenty if you are making a hat sized 23″ or smaller. If you are making a hat for sizes 24″ or 25″, though, you will need to buy larger felt that can produce 3 pieces that are 9″ x 14″. (I buy my bulk felt as a single 1-yard piece from Michaels for about $4.)
  • Optional: Two sew-on snaps. This is to make the ties removable. If you don’t want to deal with snaps, you can also simply make a knot to attach the ties to the hat. I don’t recommend buttons or hooks, because hair can get caught in them.

The materials listed above will be enough for all the different hat sizes available in this post. Of course, if you are making one of the smaller hat sizes, you’ll end up with some leftover fabric – maybe even enough to whip up a small drawstring bag to match the hat. (But that is a pattern for another day…)


Measure Your Head & Print Your Pattern

To start, measure the head circumference of the person getting the new hat. Wrap a tape measure around the head, going just above the eyebrows and ears and going around the back at the widest point of the base of the head.

Don’t pull the tape measure too tight while measuring, but don’t worry about leaving any extra slack, either. The patterns include 1″ ease already. (In other words, the hat for an 18″ head is actually 19″ around its base.)

Once you know the circumference measurement of the head getting a new hat, go ahead and print the correct pattern size from the options below.


Pre-Shrink Your Fabric & Cut Your Pieces

I really cannot emphasize this enough: Run your fabric and felt through the washing machine and dry it on high temperature to shrink the fabric down as much as possible before you cut the pieces. There is nothing worse than putting a lot of energy into sewing something, only to have it shrink in the wash and not fit anymore.

Once you have pre-shrunk your fabric, go ahead and cut out the pieces as directed in the pattern. In addition to cutting the pattern pieces that you print, you also need to cut enough diagonal 2-inch-wide strips to make about 2 yards of 1/2-inch double-fold bias tape. (There’s a great video on how to cut and sew your own bias tape here.) You only need to cut your bias tape strips from the lightweight patterned fabric. Do not cut bias tape strips from your liner fabric.

Here is one possible layout for cutting your fabric from a half-yard of 45″ fabric. (Keep in mind, this layout shows the largest hat size of 25″. For smaller hats, you’ll end up with more leftover fabric and may even want to arrange the pieces differently as you cut.)

If you buy your fabric as two fat-quarter squares, this cutting layout will work better for you. Note that the top and bottom edges are 22″, and the side edges are the shorter 18″ edges of the fat quarter.

Last but not least, cut your felt. As I mentioned above, you should have no trouble cutting from a standard 9″ x 12″ piece of felt if you are making hat sizes 18″ through 23″. If you are making size 24″ or 25″, though, your felt pieces will need to be bigger.


Phew! Are you finished with that prep work? Then head on to part two of this post, where I explain how to sew all the pieces together!