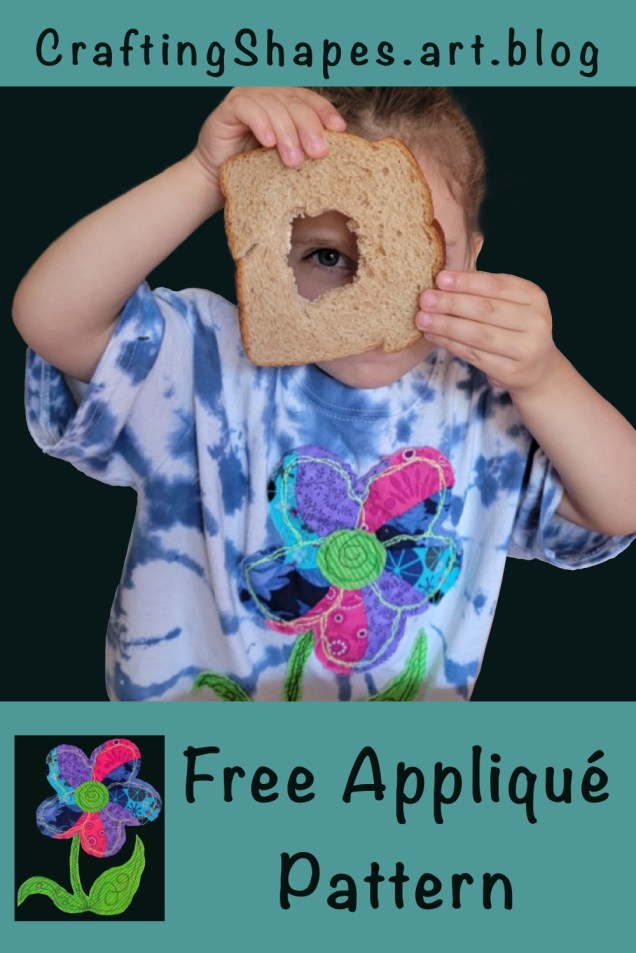
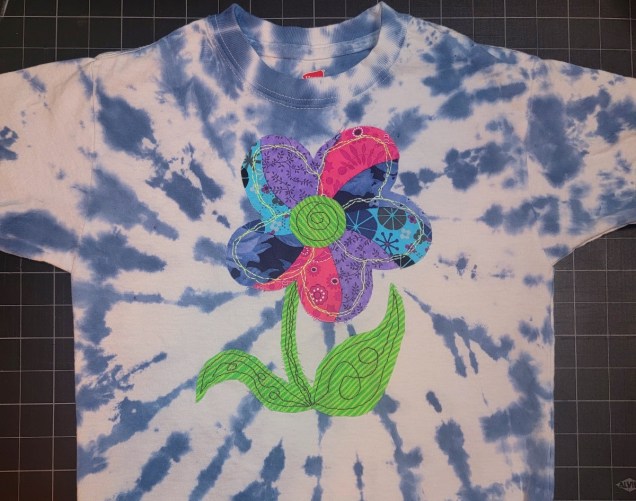
My 6 year old made a crazy ton of tie-dyed t-shirts at summer camp this year. I snagged this one and spruced it up with a raw-edge flower appliqué design. I think the appliqué’s fraying edges and purposely crooked stitching works well with the tie dye pattern.
Of course, you don’t have to put this appliqué over tie dye. If you do want to, then the shirt pictured here has a single-color spiral tie-dye pattern, where the middle of the spiral is centered slightly higher on the chest. I’m pretty sure there are 10 bajillion tutorial videos on YouTube explaining how to do that, so I’m gonna leave those instructions to the dye masters of the universe. Once you’ve got your shirt ready, come on back here for the appliqué part.
All set? Great. Let’s get to the good stuff then.
Materials Needed
The Pattern – Download the printable pattern here! As printed, the finished applique is 9.25″ tall and 6.5″ wide.
T-shirt (or whatever item you want to sew your appliqué onto) – The shirt pictured here is your basic Hanes white t-shirt that was then dyed. I used a child size small.
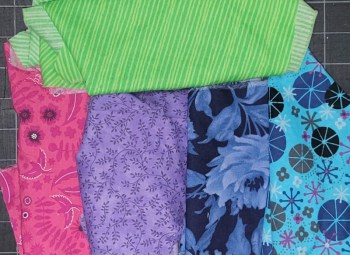
Fabric scraps in 5 different colors/patterns – I used quilting cotton scraps, which are guaranteed to fray around the edges after a few washes. One of the fabrics should be green or brown for the flower stem, leaves, and center. The other four fabrics are for the flower petals. In choosing my own, I wanted these fabrics to have a color scheme that transitions well from one color into the next as it moves around the flower.
Thread in 2 colors – I use regular all-purpose thread, not embroidery thread or string. Choose colors that will pop and be obvious against the fabric. One color will be for the stem/leaves and flower center. The second color will be for the petals.
Fabric marker or chalk – Believe it or not, I use Crayola Ultra-Washable thin markers for almost everything I do. The stuff is magic. Easy to write on fabric with. Shows up well. Inexpensive. And it washes out without a trace 99% of the time. (PLEASE do a test swatch first, though, to make sure it washes out for you before you mark up a huge project with it!)
Elmer’s glue stick (optional) – I use this to hold the fabric layers together temporarily while I sew them together. I don’t mind the glue, since I’m sewing by hand. If you don’t have glue, you can use safety pins as an alternative.
Embroidery hoop (optional) – Again, you only need this if you’re sewing by hand, and even then, it’s optional but recommended. I find the hoop makes the sewing easier and faster.
Skip the fabric interfacing – While typically I’d use and recommend fusible interfacing in a project like this, I purposely skip it here. I WANT the edges of my flower to fray as part of this pattern. Interfacing will stop or at least limit the fraying, so I don’t use it here.
Prepare Your Materials
Step 1:
First, throw all your fabric (including the t-shirt) into the washing machine and dryer to pre-shrink it. Don’t skip this step.
While you’re waiting for your fabric to wash and dry, print the 3-page pattern and cut out the pieces on pages 2 and 3. Cut those pieces out along the solid lines. Leave the dotted seam lines alone. Also, don’t cut anything on page 1. You’ll want that page intact later on.
Step 2:
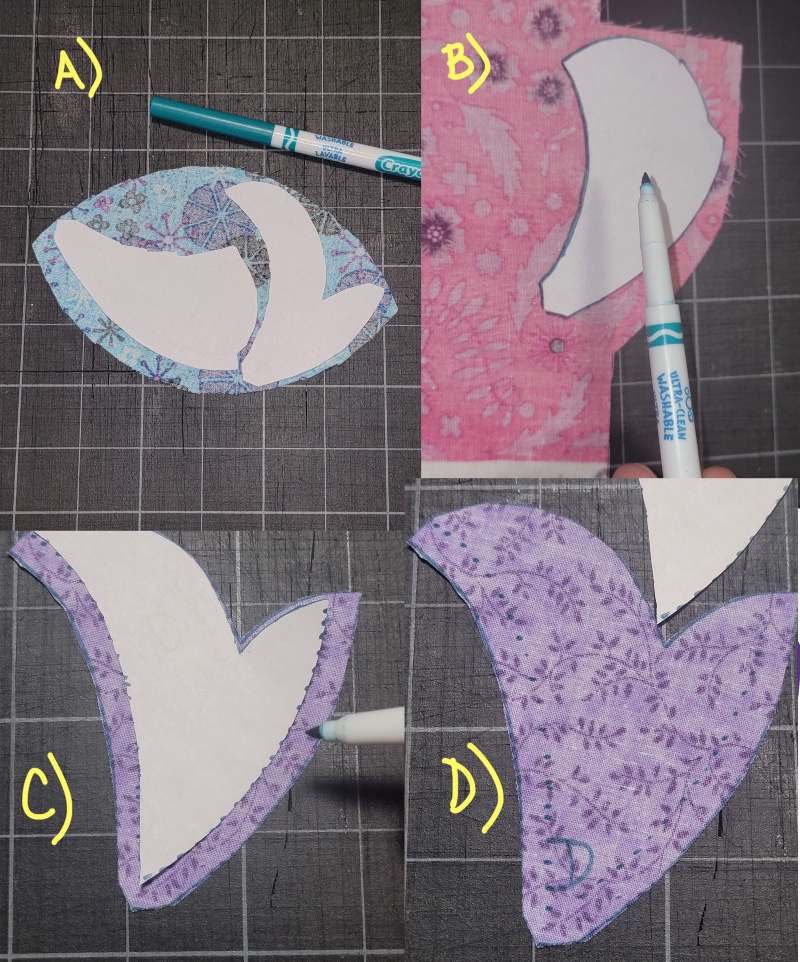
Now it’s time to cut your fabric. Place your fabric right-side down. Then place your pattern pieces printed-side down on the fabric. (See image A.)
Trace around the pattern piece with your fabric marker. (See image B.) Cut out the fabric along the line you just traced.
Now take the SAME pattern paper you just used. Originally you cut it out along the solid cut lines, right? Now cut the paper again, but this time cut along the dotted seam lines. (Note: the outside edge of the petals don’t have dotted lines to cut. That’s on purpose.)
Put the newly-trimmed pattern paper back onto the fabric piece you cut. Align it so the petal’s solid-line outer edge matches the edge of the fabric. (See image C.)
Mark the seam lines on the wrong side of the fabric as shown. You can draw a solid line onto your fabric, but I think making dots is better. Dots are less likely to soak through to the right side of the fabric. (See image D.)
In the image above, you’ll notice that I also use my marker to write each petal’s letter on the wrong side. This is just to keep myself from losing track of the pieces. Only do this if you are POSITIVE your mark will wash out and/or not be visible on the right side of the fabric.
Step 3:
Time to sew the petal pieces together! Using page 1 of your printed pattern as a guide. you will sew petal A to B, then B to C, then C to D, and so on.
I hand sew the seam lines with a backstitch. You can use a sewing machine here if you want, but personally I find I have better control matching up the pieces precisely when I do it by hand.
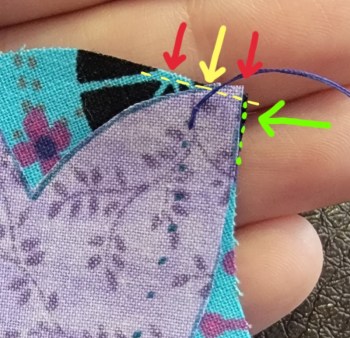
With right sides together, match up the pieces so that the top/outer edge of the two petals align at the intersection with the seam line. It’s important to understand here that the petals will ONLY align at this intersection. Let me explain…
Look at the close-up image here. The seam-allowance edges meet up along the green dotted line (green arrow). That part is pretty straight forward. But equally important is the top edge of the petals (or the edges that will become the outside edges of the flower itself.) Look at the dotted yellow line. The yellow arrow marks the point along this dotted line where your seam intersects. As you move left of the yellow arrow, the blue petal edge extends up higher than the purple petal. As you move right of the yellow arrow, the purple petal extends up higher than the blue petal. It is only at that 1/4-inch seam intersection where they meet exactly.
To recap that somewhat confusing paragraph: line up the petals’ seam edges (green dotted line) so they meet. THEN move one of the petals up or down until the upper edges meet at the seam line (yellow arrow point). This is where you want to start sewing.
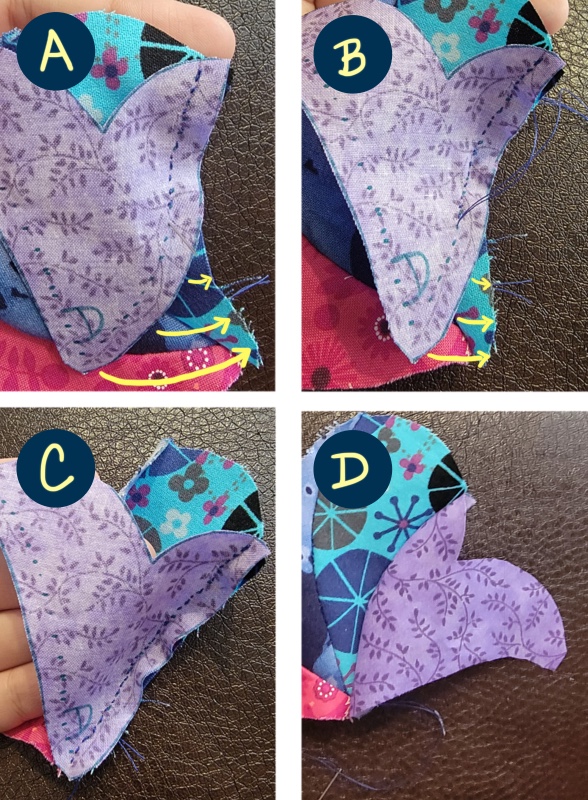
Sew your backstitch along the dotted line you marked on the petals, keeping 1/4″ seam the whole way down. As you sew, you will need to curve and reposition the petal edges to keep them even with each other. (See images A through C.) When you reach the end of a seam line, open the petal flat (image D) and repeat step 3 with the next petal piece.
Do step 3 for each petal piece until the entire flower is sewn together. Don’t worry if any of your petals end up longer or shorter than the rest at the center, since the middle of the flower will be covered up anyway. It’s more important that the outer edges line up correctly.
Step 4:
Once all your petals are sewn together, press the seams flat as shown. Iron from the outside of the flower toward the center, gently guiding the center point to overlap its seams as flat as possible.
Step 5:
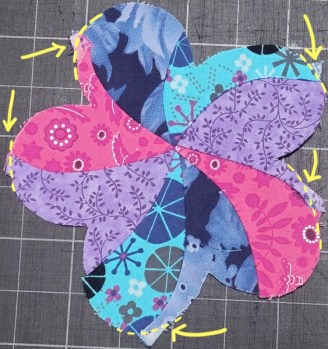
Turn your ironed flower over so the right side faces up. Trim around the outside of the petals in any spots where seam allowance sticks out. You want the petal curves to be as rounded and clean cut as possible, because these raw edges will show in the finished piece.
In the image here, I cut everywhere there is a dotted yellow line.

Step 6:
Hey, remember in step 1 that I told you to leave page 1 of your pattern uncut? This is why.
Place piece J of your pattern (the stem and leaves) onto your printed pattern and line it up. With your glue stick, put a dab of glue on the top 1/2 inch of the stem on the right side of the fabric.
Place the flower petals over piece J, as shown, also lining up the petals in their respective places. (In other words, petal A is in the petal A spot. Petal B is in the petal B spot, etc). Press firmly where you put glue at the top of the stem to attach the petals to the stem.
With your glue stick, add glue to the wrong side of the fabric on piece I (the flower’s green center circle). Put piece I on the center of the flower and press firmly to attach it to the petals.
Remove the fabric from the paper before the glue dries fully, in case any got onto the paper.

Step 7:
With your glue stick, put a few dabs of glue on the wrong side of the fabric flower. Then position your flower about 1 to 2 inches below the neckhole and press it firmly to help the glue adhere. In the picture here, the flower is 1.5″ below the neckhole. (That 1.5″ includes the ribbed fabric around the neck.)
You do NOT need a ton of glue here. Ultimately, the sewing will hold your flower in place and the glue will wash away in the laundry. So just use enough in key spots to help the fabric stay in place while you sew. If you overdo it with glue, you’ll find it difficult to pull your needle through the glued fabric.
Step 8:
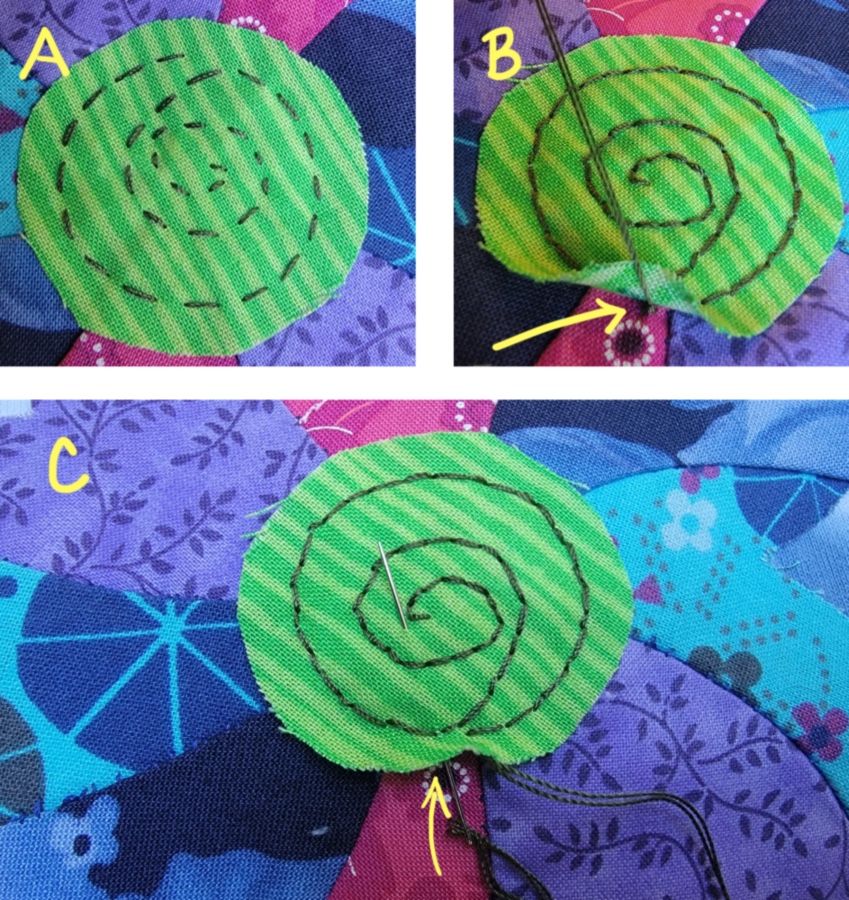
With two strands of thread, sew a running stitch in a spiral on the flower’s center circle. Start at the outside and sew inward to the center of the spiral. Leave 1/4″ of fabric unsewn around the outer edge. Do not tie off your thread yet. (See image A.)
When you reach the center of the spiral, sew back out with another alternating running stitch to fill in the gaps. (See image B.)
In sewing this, the goal is to have NO knots on the inside of the shirt. A knot inside a shirt equals chafing or, at the very least, itchiness. Anytime you need to end a thread, take advantage of your raw edges and applique layers to hide the knot. For example, the thread in the flower’s center is knotted ABOVE the petal fabric but UNDER the green center. (See image B, where the yellow arrow points to the knot.) After making a knot, I hide the excess thread by inserting the needle under the green fabric (still above the petal fabric) and bring it up again about 1/2 inch away. (See image C.) Once the thread is drawn up snugly, I cut any remaining thread off right against the fabric (being careful not to cut the fabric itself.)
(Side note: This goal of comfort inside the shirt is also why I choose the double running-stitch method instead of a backstitch. It leaves less thread overlap inside the shirt.)
Step 9:
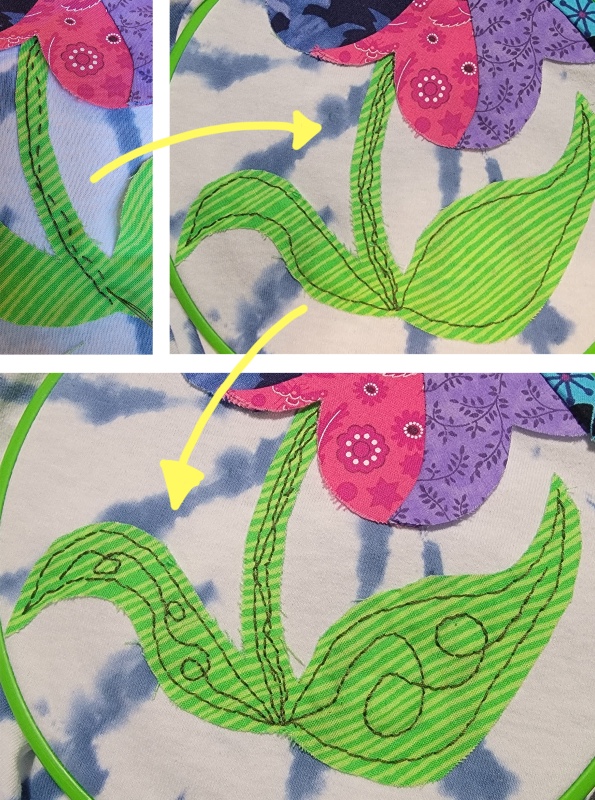
Sew the leaves and stem with the same running stitch method done in step 8. Begin at the base of the stem and sew a running stitch up and under the flower petals. Then sew back down to the stem’s base along the same stitch line, filling in the gaps. Go up and down the stem this way a total of three times, intertwining your stitch lines randomly. Remember to leave unsewn fabric along the stem edges for fraying. (See the top left and top right pictures.)
When you’ve finished the stem and are back at the base, begin to sew a running stitch around the edge of one leaf, 1/4 inch from the edge. When you’ve returned to the stem base, sew around the same leaf a second time with an alternating running stitch to fill in the gaps. Do the same with the second leaf. (See top right image.)
Last but not least, sew the topstitched curly lines inside the leaves. You can lightly mark the lines with chalk or washable marker, or you can freehand it. (I did not use my Crayola marker here, because I was nervous it wouldn’t wash out. Instead, I used fabric chalk.)
As before, start at the stem base, sew a running stitch along the path, and then sew back along the same path with an alternate running stitch to fill in the gaps. Do the same to the second leaf. (See bottom image.)
Step 10:
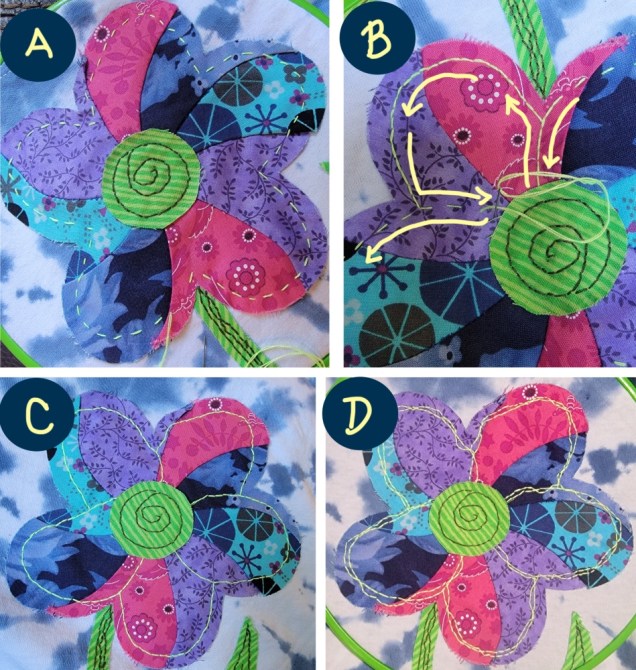
It’s petal time! Do a running stitch around the outside edge of the petals, leaving 1/4 inch raw fabric along the edge. IMPORTANT! When you do this first running stitch, do NOT sew all the way to the center green circle. Instead, stop and turn the corner when you reach the next petal, always remaining 1/4 inch from the outer edge. (See image A.)
Once you’ve sewn around the petals once, go ahead and sew the second running stitch along the same path to fill the gaps. Except THIS time, when you reach that corner where two petals meet, keep sewing a running stitch down to the center green circle. Keep sewing your running stitch under the green fabric until you reach its seam. Then reverse direction and sew back up, filling in the running stitch gaps. Continue like this all the way around the flower. (See image B, where the yellow arrows show the path that you follow this second time around the flower.)
Image C here shows what the flower looks like with a completed round of doubled running stitch. Once this is done, repeat step 10 a second time, randomly interweaving your stitching lines. Image D shows the flower after both rounds of doubled running stitch are finished.
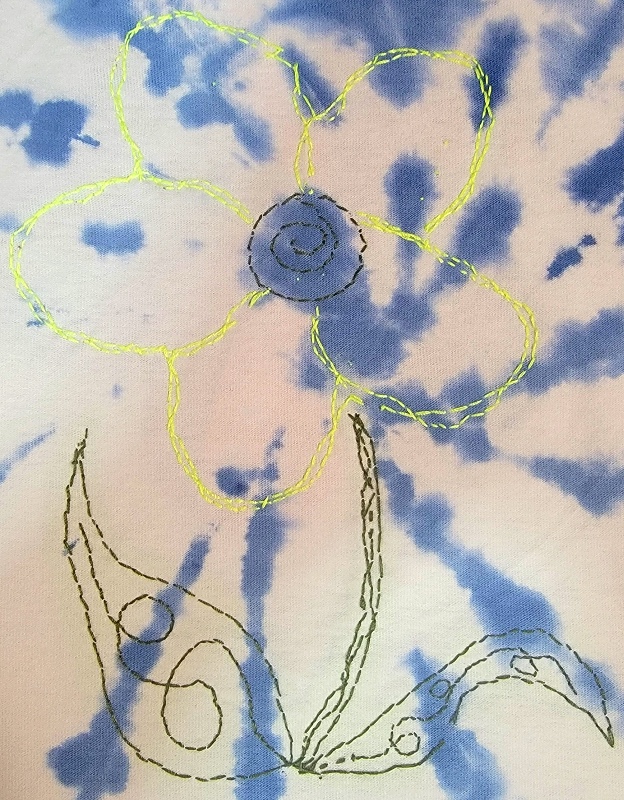
That’s the whole shebang! If you’re curious, here is what the inside of the shirt looks like when I finished it. As you see, there are no knots anywhere, just single lines of stitching. The thread softened up nicely after a round in the laundry, so it ended up quite comfortable to wear. That being said, if you do find that the inside of your shirt seems uncomfortable, I recommend ironing a large piece of single-sided interfacing over the finished inside stitching. This can help minimize the feeling of thread against skin.
Did you use this pattern? Let me know what you thought in the comments below!