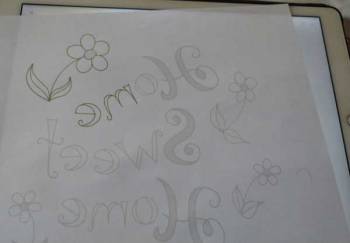
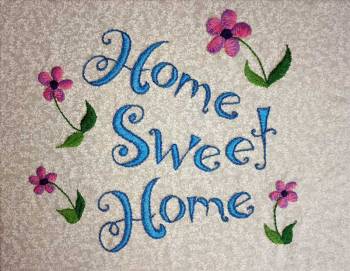
I’ve been working on my own hand embroidery lettering lately, and this is my first attempt at a project using it. This free embroidery pattern has your traditional “Home Sweet Home” motif… always a safe go-to in my book. I’ve made the pattern available both in regular and mirror-image format.
Click here to download the regular PDF pattern.
Click here to download the PDF pattern as a mirror image.
For tips on how I transferred the pattern to fabric and then stitched each section, keep on reading!
Tip #1 – Pattern Transferring
I print out the pattern and then trace the back of it using the fine-tip embroidery transfer pens from Sublime Stitching. I use my iPad as a lightbox to trace the pattern by setting up the iPad’s “Guided Access” feature to disable the touch screen. It works like a charm. Then all I need to do is iron my homemade transfer pattern to my fabric!
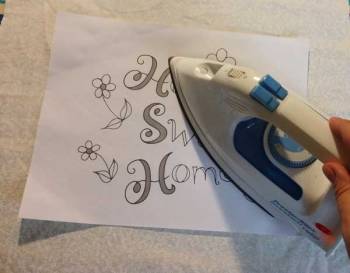
I’ve used these Sublime Stitching embroidery pens for numerous projects, and they work great on light-colored fabric. The only issue I’ve had with these pens is that the ink can fade over time as my hand rubs the fabric on larger projects. I solve this problem by touching up the pattern in trouble spots with a well-sharpened #2 pencil. Obviously, I’m very careful when doing this, because I don’t want to damage the fabric by pressing too hard with the pencil.
Tip #2 – Stitching the Letters
For the upper case and lower case letters alike, I began by outlining the letters with a stem stitch. I chose a deep blue for the letter outlines. Then I filled in the letters with a satin stitch in light blue.
You could also do each entire letter in the same color, but I personally like the light/dark contrast. I think it helps the letters to pop a bit more.
Stem Stitch 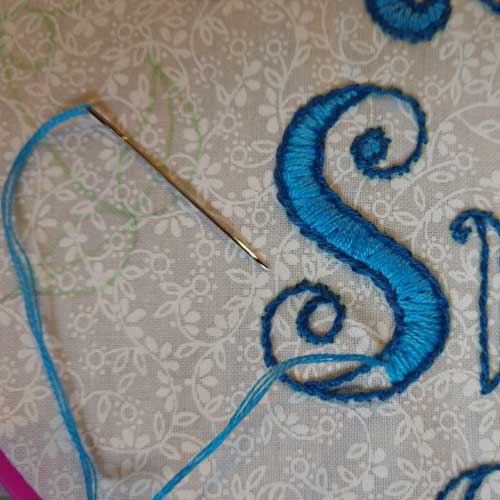
Satin Stitch
Tip #3 – Flower Stems & Leaves
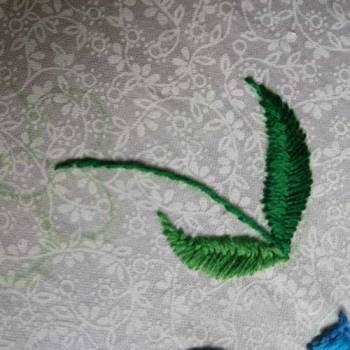
After finishing the lettering, I moved to the flowers. For each flower, I worked the stem and RIGHT leaf in the same dark green. Then I worked the LEFT leaf using a lighter shade of green.
The flower stem is worked as a stem stitch. Then I did the leaves with the fishbone stitch. To avoid making the finished project too busy-looking, I chose not to outline the leaves or flowers the way I did the letters.
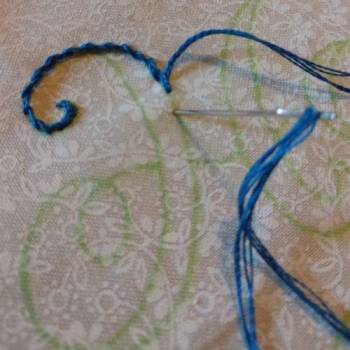
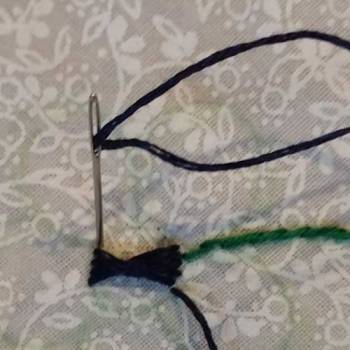
Tip #4 – Flower Centers
The centers of my flowers are very dark – an even darker blue than the letter outlines. I did these with my personal variation on a satin stitch. First, I worked my way around the circle by bringing the needle up at the bottom of the right side and then putting it down through the fabric at the top of the left side. (See the first picture below.) I worked around the circle this way, creating a spiral that overlaps in the center.
When the circle was completely filled in, I then inserted the needle into the CENTER of the spiral and pulled it through. This helps to anchor the overlapping threads in the center.
Satin Stitch Variation, Step 1 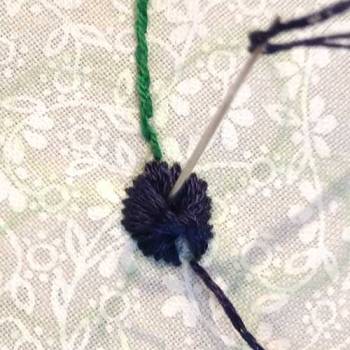
Satin Stitch Variation, Step 2
Now, if you don’t like my method here, you could probably work a simple satin stitch or even a buttonhole stitch to fill in the flower centers. I personally like to do it this way, because it causes the center of the flower to pop up more.
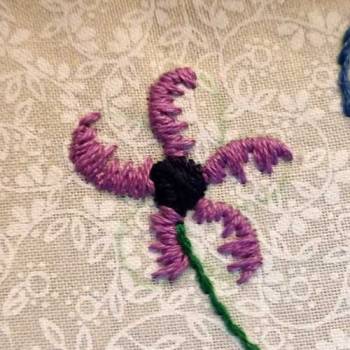
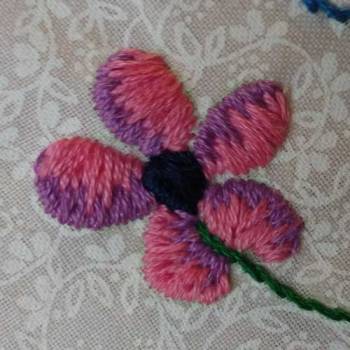
Tip #5 – Flower Petals
Finally, for the flower petals themselves, I did a long & short stitch using light pink and light purple threads. I began with the purple along the counter-clockwise side of each petal. Then I filled in the rest of the long-short stitching with pink on the clockwise side of each petal.
After that, the only thing left to do was to mount the fabric on a board and hang it up on my wall. Hooray for making my sweet home a little sweeter with a new free embroidery pattern. :)
Rules & Restrictions for This Free Embroidery Pattern:
All patterns found on Crafting Shapes are fully my own designs unless specifically stated otherwise.
You are not allowed to… sell any part of this free embroidery Home Sweet Home pattern in part or as a whole, nor may you sell the finished creation that results from this or any other pattern on Crafting Shapes.
You are welcome to… print, duplicate, and create this project for your personal, non-commercial use. You are also welcome to give finished projects as gifts to others or donate them for free to charitable causes.
If you choose to share this free embroidery pattern online (such as on Pinterest or through your own blog), please link directly to this post and support my ability to create future free patterns for all to enjoy. (Do not copy/paste the pattern into your own blog, for example.)