
I’m back and ready to share some new patterns, now that the insanity of pandemic life has abated a little. Which is to say, finally I don’t have to monitor distance learning for three of my kids while the fourth kid transforms her terrible twos into an art form. I’ve never been so excited for summer break!
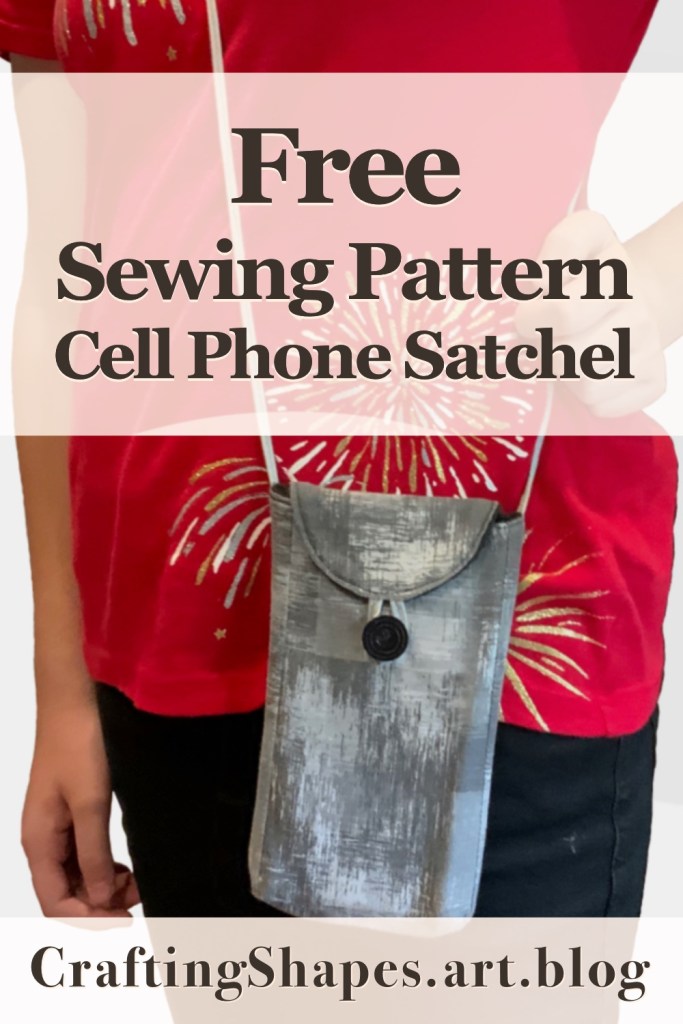
Speaking of “breaks”, I broke my cell phone this month. It happened in such an annoying way, too. I took a post-dinner walk with my kids, and I was holding my phone in my hand at my side. I guess I loosened my grip a bit, because the phone slipped through my fingers and landed face-down on the road. Smash.
Why was the phone in my hand? Whelp, sadly none of my pants have pockets big enough for my Sasquatch-sized phone, and I definitely don’t want my mega mom purse on my shoulder when I’m relaxing outside. What I needed was a small bag just big enough for my phone. A bag that won’t slip off my shoulder when I lean over to pick up my toddler or kneel to pull garden weeds.
With that in mind, I whipped up this little bag to protect my phone. The entire project took about two hours, including fabric cutting time. The strap is long enough to wear diagonally across my shoulder. I can also easily adjust the length of the strap with a quick knot, so the bag can hang higher or lower depending on my activity of the moment. The interior is lined with craft felt, which adds a little extra protection if the bag bumps into something.
Since this post is a bit lengthy AND photo heavy, I’m splitting it into two parts. So without further ado, here goes part one!
Tools & Materials Needed for Your Cell Phone Satchel
First, of course, you’ll need to print the pattern.
Click here to download the PDF pattern for this cell phone satchel.
This pattern is for a bag with the finished dimensions 7.5 inches tall, 4 inches wide, and 1 inch deep. (Seriously, my cell phone is a beast.)
You will need the following materials…
- Decorative fabric for outside of bag: one piece 8.5 by 18.5 inches. I recommend a cotton quilting fabric. This will be enough for your cell phone bag, even if your fabric has a directional pattern. This is about half of a fat quarter (one of those pre-cut squares of fabric you see in Walmart’s craft aisle).
- Felt for bag lining: 2 pieces of 9 x 12 inch felt from the craft aisle will be more than enough. I used black felt for my lining, but you can pick whatever color you think compliments your main fabric the best.
- Approx. 5 feet (the example pictured used exactly 63 inches) of 1/4-inch double fold bias tape (You can also get 1/2-inch single fold bias tape and fold it in half to make 1/4-inch double fold tape.) – You can make your own tape from the same fabric as your bag’s exterior, or you can buy pre-made double fold bias tape in a color that matches or compliments your bag’s main fabric. If you opt to make your own, you will need about 1/4 yard of your main fabric to have enough for your pattern pieces and your bias tape.
- Sewing thread in two colors – one to match your main fabric, and one to match the color of your felt.
- One button – The button size can be based on your personal preference. I used a 3/4-inch button on my purse.
For tools, you really just need the basics…
- Sewing needle – You’ll need this even if you use a sewing machine for most of the stitching. The sewing needle will come in handy to put on your button and also to sew a small section of your bag closed when you turn it right side out.
- Pins – Pinning your fabric together before sewing can certainly help ensure that your fabric pieces line up correctly.
- Iron – Don’t skip this, especially if you are making your own bias tape!
- Sewing machine (optional) – There is no reason you can’t sew this entire project by hand with a basic backstitch, but the instructions I give will be for a sewing machine.
Prepare and Cut Your Fabric
Once you have printed your cell phone bag pattern, it’s time to start cutting. The suggested cutting layout below is for your main fabric. It will work on both a fat quarter or on a quarter yard of 45 inch wide fabric. Either way, it will use approximately half of your fabric if you have a quarter yard. Make sure to pay attention to the direction of the grain line, especially if your fabric has a directional pattern on it.
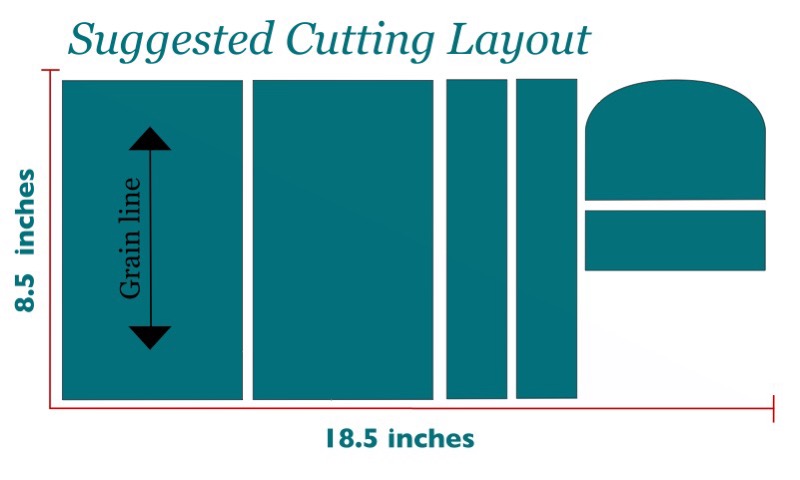
If your felt is in the typical size of 9″ x 12″ pieces, then you can cut the front and back panels from one piece of felt, and cut the rest of the pieces from the second piece of felt.
Sew Your Main Fabric
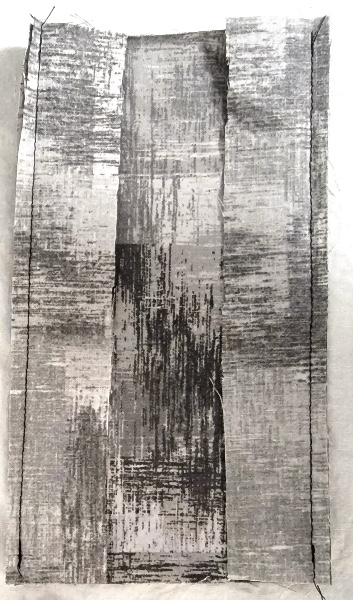
Step 1: With right sides facing, sew both side panels to the front panel, as shown. Note well: All the sewing lines in this pattern use 1/4 inch seam.
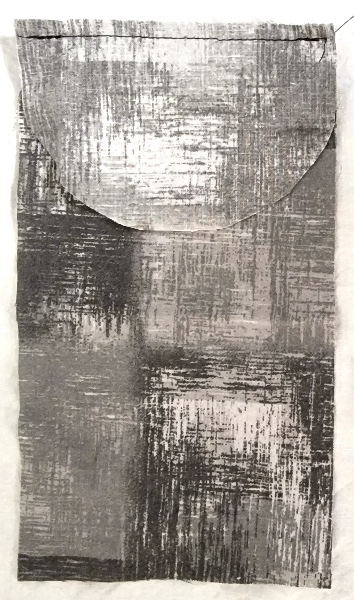
Step 2: With right sides facing, sew the top panel to the back panel.
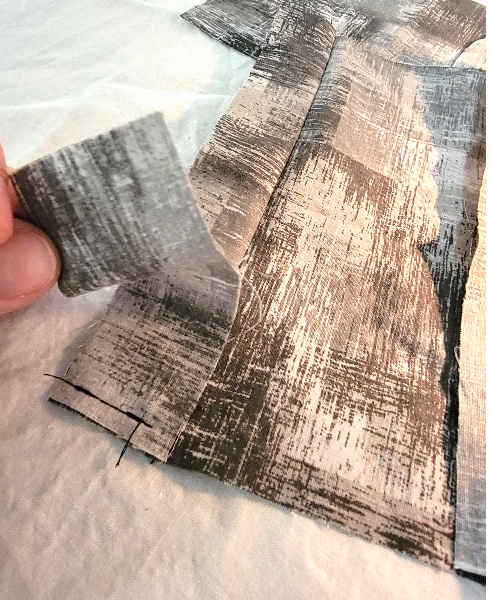
Step 3: With right sides together, match up the short side of the bottom edge with the short side of a side edge. Notice that the outside corners line up completely, but the inside corner of the bottom piece extends 1/4 inch past the seam line from step 1. Important: your stitching should go all the way to the outer edge, but at the inner edge, it should NOT go past the seam line from step 1, instead stopping 1/4 inch from the inner edge.
Step 4: Keeping right sides together, guide the bottom panel so that its other short edge lines up with the short edge of the second side panel. As in step three, the outside corners of the two pieces should line up. The stitching should go all the way to the outside edge, and it should once again stop 1/4 inch from the inside edge of the bottom panel, not extending past the stitch line from step 1.
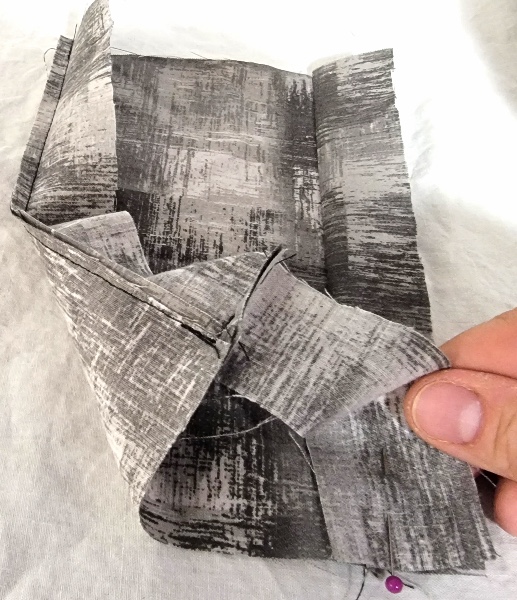
Step 5: Gently tug the seams and corners until the bottom panel lies flat against the front panel, with their long edges lined up. Sew the panels together, with the stitch line stopping at the seams from steps 3 and 4, about 1/4 inch from each end.
Step 6: Make sure all seams are pressed away from the bag center and toward the outside edges. With right sides together, pin the final edge of the bottom panel to the bottom edge of the back panel. Sew the panels together, stopping at the seams from steps 3 and 4, about 1/4 inch from each end.
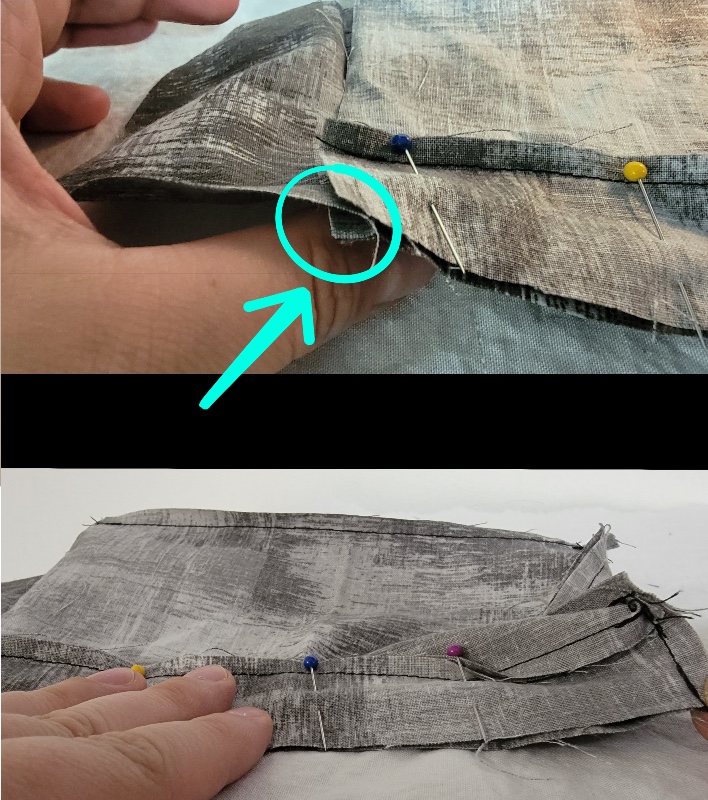
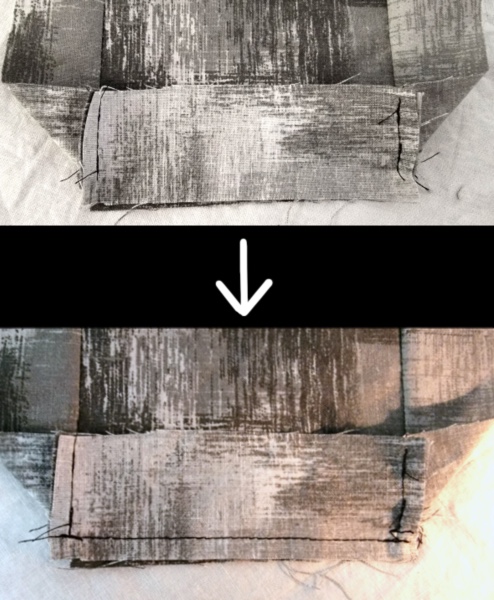
Step 7: Now it’s time to sew the side of the bag. Pin the long edge of the back panel to the long edge of one side panel. Be sure all seams are pressed away from the center. The top corners should line up, as shown in the circled part of the picture. Sew all the way to the top edge, but stop 1/4 inch from the bottom edge.
Important! Only sew one side of the bag in step 7. Leave the second side open for now.
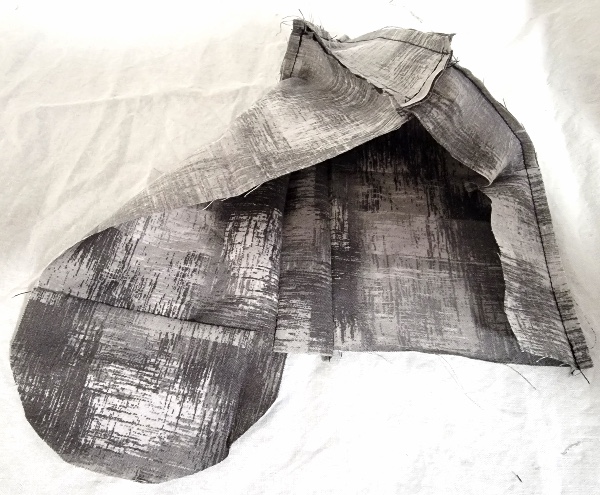
This is how your bag should look at this point.
Cut and Sew Your Bias Tape
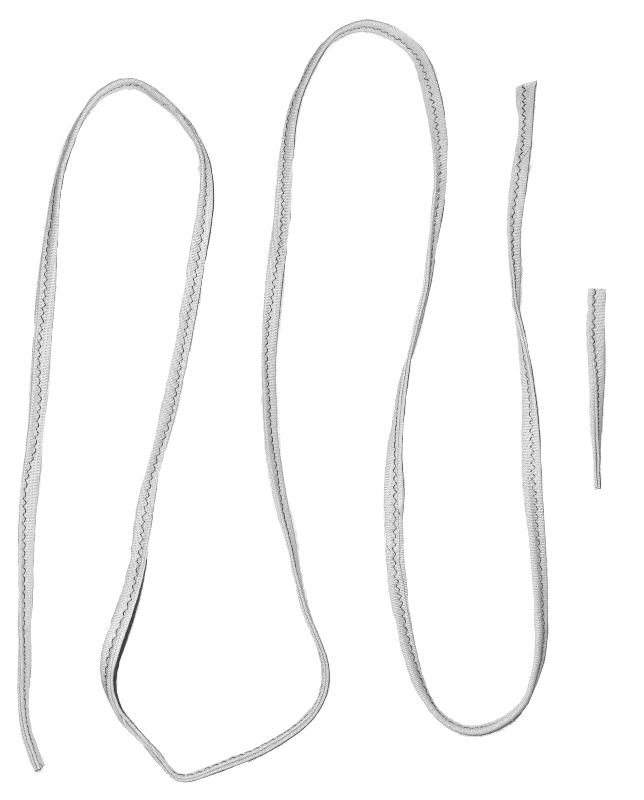
Step 8: Cut two pieces of double folded bias tape.
The first piece should be about 4 to 5 feet long for the shoulder strap. The length you cut depends on how low you want your bag to hang. Include 1/2 inch for seam allowance.
The second piece will be your button loop. It should be long enough that it will easily fit around your button when the ends are pinched together to make a circle. Also include 1/2 inch seam allowance to this piece.
For the bag pictured, I cut a 5-foot piece (60 inches) for the shoulder strap, and I cut a 3-inch piece to fit around my 3/4 inch button.
Step 9: Sew along the entire length of both pieces of bias tape. Use a slight zigzag stitch, so your thread maintains a small amount of stretch. In my bag, I sewed with a stitch length of 3 (out of 5) and a stitch width of 2 (out of 5).
Do not fold the ends of the bias tape when sewing. By leaving the ends raw, they will be easier to attach to the bag. The raw ends will get hidden when sewn to the bag later.
Sew Your Felt Liner

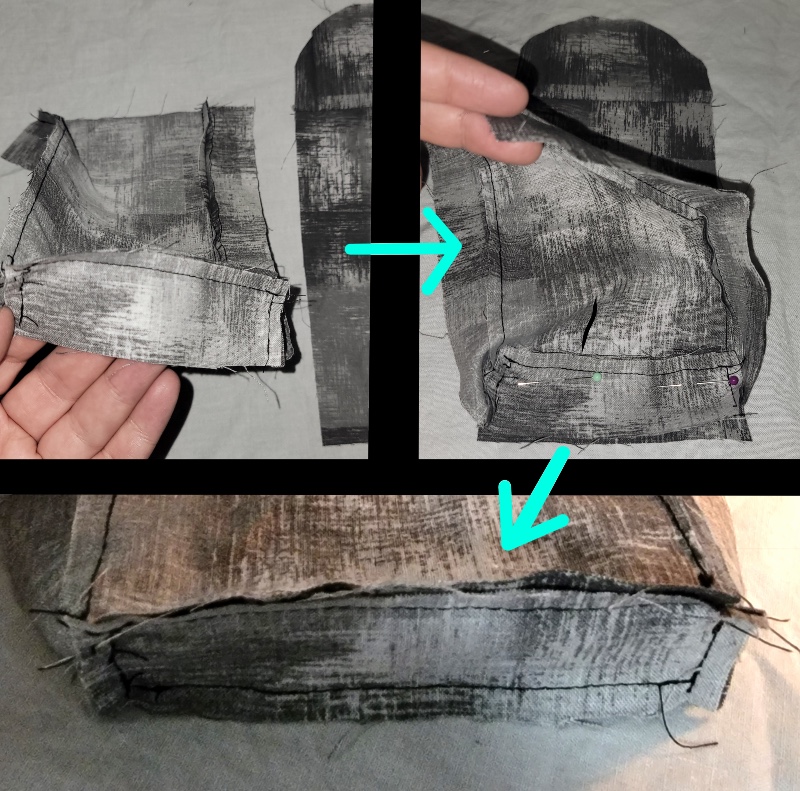
Step 10: Set aside your main fabric for the time being. Repeat steps 1 through 7 with the felt liner panels. Important: When you reach step 7, sew the opposite side from the one you stitched with your main fabric.
When you finish step 10, your main fabric and liner felt should look like this picture, with opposite sides left open.
Start putting all the pieces together in part two!
Are you ready to jump into part two and finish sewing your cell phone bag? Click here to jump into the second part of this sewing tutorial.